Ultimate Guide to Tiny Home Blueprints
A practical guide to tiny home blueprints covering plan types, how to read and customize drawings, costs, permits, and the build process.
Nomad Adjacent3 months ago
Ultimate Guide to Tiny Home Blueprints
Tiny home blueprints are your roadmap to creating a functional, small-scale living space under 1,000 square feet. They provide detailed plans, covering everything from floor layouts to utility schematics, and are essential for ensuring your home meets safety and legal standards. Whether you're constructing a stationary tiny house or a mobile one, blueprints are a must-have for accurate budgeting, material planning, and compliance with building codes.
Key Takeaways:
- Blueprint Basics: Include foundation, framing, floor plans, elevation drawings, and utility layouts.
- Cost Efficiency: Tiny homes cost $30,000–$60,000 on average versus $428,215 for traditional homes.
- Types of Tiny Homes: Stationary homes (built on foundations) vs. mobile homes (on trailers).
- Blueprint Sources: Free plans (e.g., Tumbleweed Houses) or paid options ($675–$1,250+).
- Customization: Tailor layouts for local codes, personal needs, and space efficiency.
Quick Comparison:
| Feature | Stationary Homes | Mobile Homes (THOWs) |
|---|---|---|
| Foundation | Permanent (slab, basement) | Trailer-based |
| Size | Up to 1,000 sq. ft. | 130–300 sq. ft. |
| Building Code | IRC / Local codes | RV or Appendix Q |
| Cost | $90,000+ (custom builds) | $20,000–$60,000 (DIY) |
Blueprints are the backbone of your tiny home project, ensuring a smooth construction process and helping you avoid costly mistakes. Ready to dive in? Let’s explore the details.
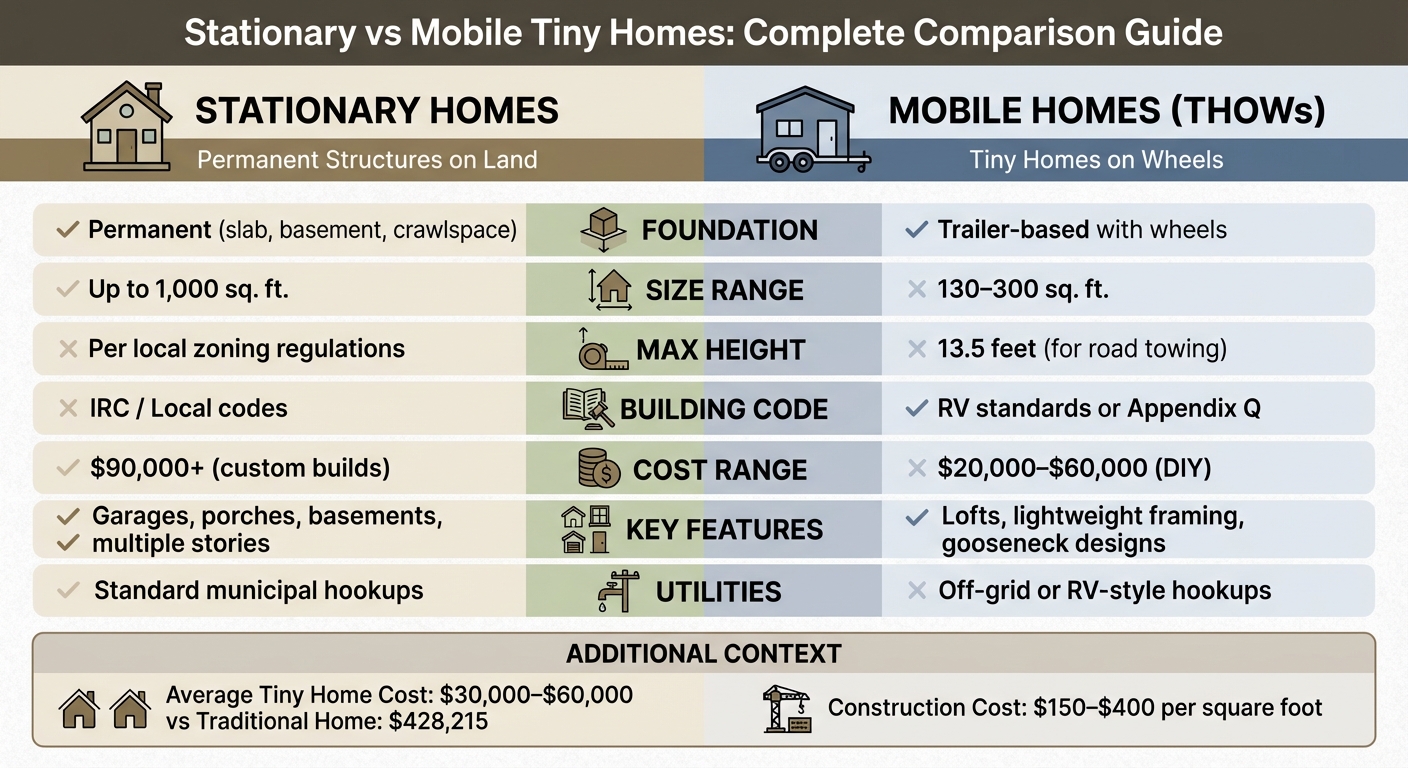
Stationary vs Mobile Tiny Homes: Complete Comparison Guide
What Tiny Home Blueprints Are and How to Read Them
What Are Tiny Home Blueprints?
Blueprints are detailed 2D diagrams that act as the construction guide for your entire tiny home project. They include everything from material specifications to exact measurements and the placement of key features.
A comprehensive blueprint set typically covers the following:
- Foundation plans: Specifications for slabs, crawlspaces, or basements.
- Framing plans: Details on wall construction and lumber sizes.
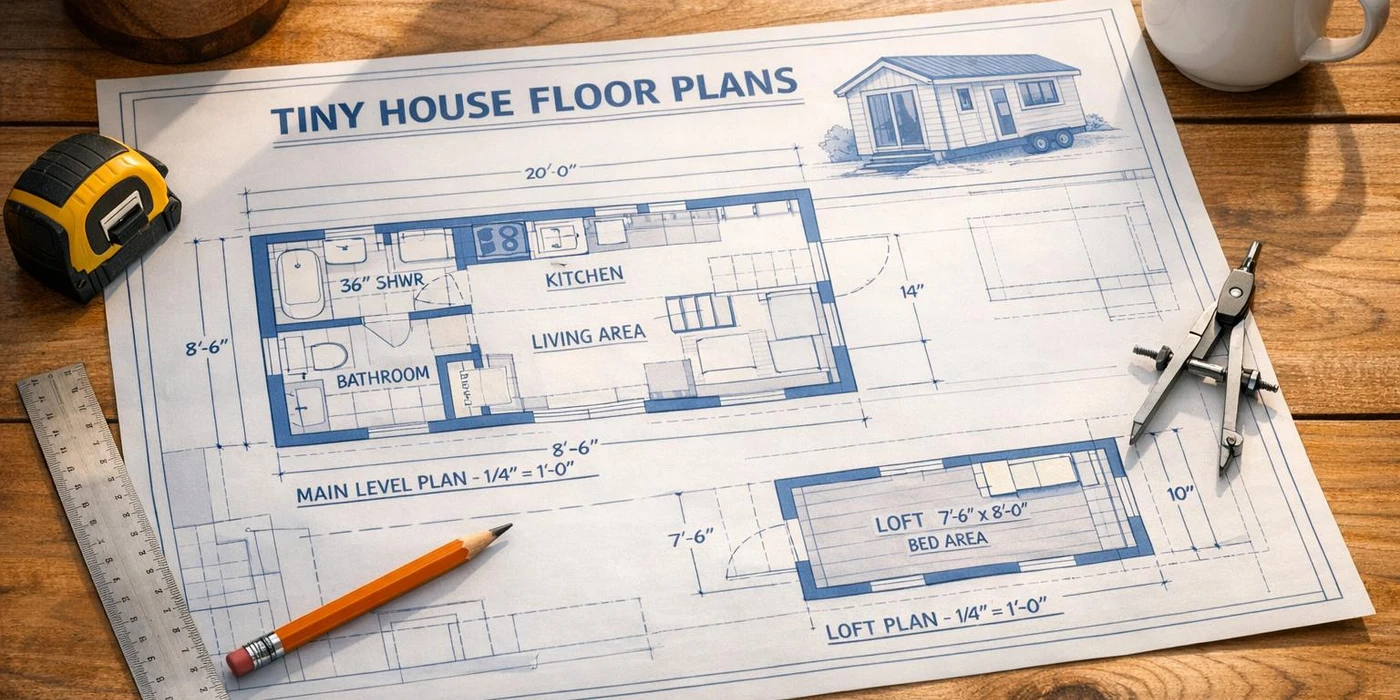
- Floor plans: Room dimensions, door and window placements, and built-ins.
- Elevation drawings: Views of all four exterior sides.
- Cross-sections: Roof-to-foundation views showing structural layers and ceiling heights.
- Schematics: Layouts for electrical and plumbing systems.
- Schedules: Detailed lists of window and door specifications.
These blueprints are indispensable for construction and are often required to secure building permits. They ensure compliance with local regulations or the IRC Appendix Q, which simplifies certain requirements for homes under 400 square feet. Beyond legal purposes, blueprints are key for accurate cost estimation and material planning. For instance, major systems like plumbing, electrical, and HVAC typically make up about 19.2% of the total build cost.
How to Read and Interpret Blueprints
Understanding blueprint symbols and scales is crucial to turning plans into a tangible home. Start with the title block, which provides the project name, architect, scale, date, and sheet number. Then, locate the legend, which acts as a visual dictionary for symbols, abbreviations, and line types used throughout the plans.
Residential blueprints often use a 1/4" = 1'-0" scale, meaning every quarter-inch on the drawing equals one foot in the actual build. However, always trust the written dimensions on the plans rather than measuring the drawing itself.
Here are some common blueprint notations to know:
- Thick solid lines: Represent visible edges like full-height walls.
- Dashed lines: Indicate hidden elements, such as pocket doors inside walls.
- Thin dimension lines with arrowheads: Mark exact distances.
- Phantom lines: Show the range of motion for movable features like door swings.
For tiny homes, pay close attention to "egress" notations for emergency exit windows and symbols for space-saving features like bifold closet doors.
One often-overlooked detail is wall thickness. A standard 2x4 stud wall with drywall measures about 4.5 inches thick. Neglecting this can make interiors feel tighter than expected. Also, look out for circles, triangles, or hexagons with numbers inside - these correspond to schedules at the back of the blueprint set, which provide specific details about windows or doors.
Tiny House Plans and 3D Walkthrough
Types of Tiny Home Blueprints
Tiny home blueprints generally fall into two main categories: stationary homes, which are built on permanent foundations, and mobile homes, designed for travel. Each type has its own structural features and layout possibilities.
Stationary vs. Mobile Tiny Home Plans
Stationary blueprints are designed for homes built on permanent foundations, such as slabs, basements, or crawlspaces. These homes must comply with IRC (International Residential Code) and local building regulations, including zoning laws and inspections. Stationary tiny homes can be larger, sometimes reaching up to 1,000 square feet, and often include features like attached garages or multiple stories. For homes under 400 square feet, certain IRC Appendix Q provisions relax requirements, such as those for loft access and ceiling heights.
Mobile blueprints, often referred to as Tiny Houses on Wheels (THOWs), are built on trailers for easy transport. These designs prioritize lightweight materials and proper weight distribution to handle the vibrations and wind loads encountered during travel. Mobile tiny homes typically range from 130 to 300 square feet and include detailed "junction point" plans that show how the structure attaches to the trailer, ensuring durability on the road.
Here’s a quick comparison of the two:
| Feature | Stationary Blueprints | Mobile Blueprints (THOW) |
|---|---|---|
| Foundation | Permanent (slab, basement) | Trailer-based (with wheels) |
| Max Height | Local zoning regulations | 13.5 feet for road towing |
| Size Range | Up to 1,000 sq. ft. | 130–300 sq. ft. |
| Building Code | IRC / Local codes | RV standards or Appendix Q |
| Key Features | Garages, porches, basements | Lofts, lightweight framing |
| Utilities | Standard municipal hookups | Off-grid or RV-style hookups |
These structural differences influence both cost and complexity. For example, mobile builds like the hOMe design - featuring 207 square feet of ground floor space and two lofts totaling 127 square feet - have estimated material costs of around $33,000 when built on a 28-foot trailer. Another example is MiniMotives, a 196-square-foot tiny home built on a gooseneck trailer by Macy Miller in 2011, which had material costs of approximately $20,000.
Now, let’s explore how layout styles can enhance your chosen blueprint.
Common Layout Styles
While the foundation and mobility define the structure, the interior layout shapes how functional and comfortable the space feels. Layouts vary in how they use vertical space and organize living areas.
Lofted designs make the most of limited square footage by placing bedrooms above living areas. However, these often require ladder access, which may not suit everyone. On the other hand, single-story layouts keep everything on one level, making them ideal for individuals with mobility concerns or those who prefer convenience. These layouts often include vaulted ceilings to create a more open and spacious feel.
"One-story tiny house floor plans featuring a ground-floor bedroom are perfect if you're close to retirement, concerned about mobility, or would rather not climb down from a loft in the middle of the night."
– Ryan Mitchell, Founder, The Tiny Life
For example, Plan 21-465 from Blueprints.com offers a single-story layout with 904 square feet and one bedroom, starting at $900.
Two-story or multi-story layouts work well for stationary homes where height restrictions are less of a concern. These designs create separate zones for sleeping and living, adding privacy and functionality. A great example is Plan 52026 (Butterworth Escape) from The House Plan Company, which spans 320 square feet over two stories and includes a one-car garage on the ground floor.
Gooseneck layouts, exclusive to mobile homes on gooseneck trailers, utilize the space above the truck bed hitch for a bedroom. This setup offers easier access via a few steps instead of a ladder and provides more stability during towing. However, it does require a pickup truck with a gooseneck hitch.
Lastly, open concept layouts remove interior walls to create a seamless flow between spaces like the kitchen, living, and dining areas. These designs often incorporate multifunctional features like fold-down tables and built-in storage to maximize space. Construction costs for tiny homes generally range from $150 to $400 per square foot, depending on materials and layout complexity.
Where to Find Tiny Home Blueprints
Whether you're tackling a DIY build or hiring professionals, there are plenty of options for tiny home blueprints. For stationary homes - those built on permanent foundations or as accessory dwelling units (ADUs) - you can explore online platforms like Houseplans.com, Blueprints.com, and The House Plan Company. Blueprints.com alone offers over 365 plans for tiny homes (1,000 square feet or less), with prices typically ranging from $675 to $1,250+, depending on the design's complexity. If you're looking for mobile home blueprints, Tumbleweed Houses specializes in "Tiny House RVs" and provides detailed 90-page plans to guide your project. For a smoother experience, you might want to consider professional services.
Nomad Adjacent Custom Tiny Home Builds
For a fully managed approach, Nomad Adjacent offers custom-built tiny homes tailored to your needs. Starting at $90,000, these designs are created through a collaborative process to ensure compliance with building codes and your specific preferences. You'll work directly with their team to craft a home that fits your vision, including layout, finishes, and structural details that off-the-shelf plans might not accommodate. Once the design is approved, construction typically takes 2-3 months. This option is ideal for anyone seeking a professional build with the flexibility to customize.
Nomad Adjacent Ready-to-Live Tiny Homes
If you'd rather skip the design and construction process entirely, Nomad Adjacent also offers pre-built, move-in-ready tiny homes. These units come fully certified, complete with high-quality finishes and appliances, so you can settle in right away. While you'll still need to arrange for parking and utility hookups, the home itself requires no additional work. Pricing depends on the model, but all units meet professional standards, making them a great choice if you're in a hurry or prefer a turnkey solution.
Free vs. Paid Blueprints: A Comparison
When it comes to sourcing blueprints, you have several options - ranging from free plans to paid designs and professional services. Here's a breakdown of what each offers:
Free plans are available but come with limitations. For example, Tumbleweed Houses provides free plans for popular models like the Elm, Cypress, and Linden. However, these designs are restricted to personal, non-commercial use.
"Professional contractors never build without plans, and neither should you. Even if you don't use Tumbleweed plans, study them. Our plans are free, detailed, and feature 90 pages of instructions."
– Steve Weissmann, Owner of Tumbleweed Houses
Using pre-made plans - whether free or paid - can save you up to 100 hours of design time, which is significant given that building a tiny home from scratch can take between 1,090 and 1,660 hours. Paid blueprints offer more variety, including styles like Craftsman, contemporary, cottage, and cabin designs, as well as options with basements or garages.
| Feature | Free Blueprints | Paid Blueprints | Turnkey Services |
|---|---|---|---|
| Cost | $0 | $675–$1,250+ | $90,000+ |
| Detail Level | High (90+ pages) | Professional-grade | Full turnkey service |
| Customization | Low (fixed designs) | Moderate (360+ styles) | High (personalized) |
| Variety | Limited (3-5 designs) | Extensive (360+ designs) | Unlimited |
| Usage Rights | Non-commercial only | Varies by license | Residential/commercial |
If you're serious about building a tiny home, it's worth investing in plans that suit your needs and meet your project's requirements. Whether you go for free designs, purchase detailed blueprints, or opt for a fully managed service, the right choice depends on your goals, budget, and timeline.
sbb-itb-718b9e4
How to Customize Tiny Home Blueprints
After finding a blueprint that catches your eye, chances are you'll need to tweak it to suit your needs. Whether it's adjusting for local building codes or tailoring the layout to your lifestyle, making changes can feel daunting. But with a step-by-step approach, it becomes manageable.
Modifying Designs for Local Building Codes
The first step is ensuring your blueprint complies with local building codes. For tiny homes, this often means adhering to the International Residential Code (IRC) Appendix Q, which outlines standards for things like ceiling heights, loft design, and emergency exits. However, not all municipalities have adopted Appendix Q, so it's crucial to check with your local building department before moving forward. If you're building a tiny house on wheels (THOW), your design should meet certification standards from organizations like the National Organization of Alternative Housing (NOAH) or the Recreational Vehicle Industry Association (RVIA).
For those considering an Accessory Dwelling Unit (ADU), additional factors come into play, such as setback requirements, maximum size limits (usually between 400 and 1,200 square feet), and parking regulations. Some areas enforce minimum dwelling sizes, ranging from 400 to 1,000 square feet, which might require you to scale up your plans. However, in Utah, state law prevents municipalities from imposing minimum sizes below 300 square feet. Your blueprint should also include technical details for water, sewer (or septic), and electrical systems to secure utility approvals.
"Planning is the most critical piece in learning how to design a tiny house." – Ryan Mitchell, Author
Before finalizing your design, meet with local building officials to avoid unexpected changes during construction. Tools like zoning finders can help you research specific regulations in your area before buying land or committing to a blueprint. Once your plans meet all code requirements, you can focus on making the space your own.
Adding Personal Features and Preferences
Customizing your tiny home is all about making it work for your daily life. Start by observing how you use space day-to-day - this can help you prioritize essential areas and cut out spaces you don’t need. Sketch ideas on graph paper or use design software like SketchUp to play around with layouts, keeping real furniture dimensions in mind.
To refine your layout, try using bubble diagrams to visualize how spaces flow together. For example, keep noisy areas like the laundry room separate from quiet living spaces. Maximize storage by extending cabinets and shelves to the ceiling, and consider multifunctional furniture like Murphy beds or fold-down desks. Pocket doors or sliding barn doors are great space-savers, eliminating the 5–10 square feet a standard door swing would require. You can also use different textures or materials, such as varied flooring or ceiling finishes, to visually define separate zones without building walls.
"Small square footage punishes sloppy planning." – ArchitectureCourses.org
Before committing to a layout, test it out in real life. Use painter's tape or chalk to mark the design at full scale, then "live" in the space for a day to see if everything functions as intended. For structural considerations, keep large windows or doors at least 24 inches away from exterior corners to maintain wall strength. If you're including a sleeping loft, aim for at least 36 inches of headroom and consider adding a skylight or dormer to make it feel more open. Finally, have a builder or designer review your plans to ensure they meet all technical and regulatory standards.
Building Your Tiny Home: From Blueprints to Completion
Once your blueprints are finalized and approved, the exciting part begins - turning those plans into a livable space. Whether you're tackling the build yourself or hiring experts, understanding the process can help you stay on track with both your budget and timeline.
Calculating Materials and Costs
Professional blueprints often include a bill of materials (BOM) - a detailed list of everything you’ll need, from lumber to screws. This list takes the guesswork out of shopping and helps avoid extra trips to the store. To stay organized, break your material needs into phases: foundation, framing, exterior, and interior.
For framing, use your blueprint’s dimensions to determine how much lumber you'll need. For example, standard wall framing typically requires studs spaced 16 inches apart. Don’t forget to account for HVAC, plumbing, and electrical rough-ins before closing up the walls. If you're building yourself, factor in the cost of tools or equipment rentals.
On average, DIY tiny home builds cost around $45,000, while hiring a contractor for a custom build can run up to $200,000. The cost per square foot is typically $150, though this varies based on materials and finishes. For DIYers, raw material costs generally range between $10,000 and $25,000. Blueprints can cost anywhere from $129 to $1,250, depending on their complexity. Alternatively, prefab kits are available for $4,000 to $10,000.
"Building a tiny house is completely doable! You simply need to plan, be open to understanding the process thoroughly, and prepare to learn from others' mistakes." – Dan Louche, Owner, Tiny Home Builders
A helpful tip is the "Thursday-Friday" approach: dedicate weeknights to reviewing your blueprint steps, create a shopping list on Thursday, and buy your materials on Friday. This way, you can focus solely on building during the weekend. Always double-check measurements before cutting - errors during framing can lead to costly fixes later. And don’t forget to secure the necessary permits before you get started.
Permits and Legal Requirements
Before breaking ground, make sure you’re familiar with zoning laws and building codes. Zoning determines where you can legally place your tiny home, while building codes ensure the structure meets safety standards. For foundation-based tiny homes, the International Residential Code (IRC) typically applies, and many areas have adopted Appendix Q, which outlines standards for homes between 120 and 400 square feet.
If your tiny house is on wheels (THOW), it might be classified as a recreational vehicle. In this case, certifications from organizations like the RVIA (Recreational Vehicle Industry Association) or NOAH (National Organization of Alternative Housing) may be required. Keep in mind that these classifications often come with restrictions on permanent residency. Many cities, however, allow tiny homes as Accessory Dwelling Units (ADUs) - secondary housing units on properties with an existing primary residence. States like California even mandate local governments to permit ADUs.
The permit process usually includes zoning verification, consultations with the building department, submission of plans, utility approvals (water, sewer, electricity), inspections during construction, and obtaining a Certificate of Occupancy. Meeting with local building officials early in the process can save you from unexpected hurdles.
"Tiny houses are legal but require compliance with local zoning laws and building codes that vary by jurisdiction." – Little Houses For Sale Team
For safety, it’s best to hire licensed professionals for plumbing, electrical, and gas installations. Skipping permits might save time initially, but it can lead to hefty fines or even forced removal of your home if a neighbor reports it.
Construction Process Overview
Building a tiny home involves several phases, each following a logical sequence:
- Planning and Preparation: Set your budget, secure financing, and gather materials and tools.
- Foundation and Subfloor: Level and anchor your trailer or pour a concrete slab. Then, frame and install the subfloor.
- Framing the Shell: Build the wall frames, raise and square them, and construct the roof structure, including loft joists.
- Exterior Sheathing and Weatherproofing: Add plywood or OSB sheathing, apply house wrap, and seal windows and doors to create a "dried-in" structure.
- Exterior Finishing: Install roofing materials, siding, trim, and fascia boards.
- Rough-In Utilities: Lay out electrical wiring, plumbing, gas lines, and HVAC ductwork. Start with HVAC ductwork, as it requires significant space and can be tricky to work around.
- Insulation and Interior Walls: Install insulation (spray foam, fiberglass, or wool), followed by a vapor barrier and wall panels or drywall.
- Interior Finishing: Complete the interior with flooring, cabinetry, countertops, appliances, and bathroom fixtures.
Building a tiny home typically takes 1,090 to 1,660 hours of labor. For full-time builders, this translates to 6 to 10 months. Weekend builders, however, might take 18 to 24 months. To avoid delays, coordinate material deliveries with each construction phase.
Interior finishes often represent the largest chunk of costs, accounting for 24.1% of the total. Major systems like plumbing, electrical, and HVAC make up 19.2%, while framing accounts for 16.6%. In the end, tiny homes are highly energy-efficient, using only about 7% of the electricity needed for a typical house.
Conclusion
Start your tiny home journey by identifying how you'll use your space. This will guide your choice of blueprint. To visualize your layout, try marking it out with blue painter's tape or sidewalk chalk - it’s a simple way to see how everything fits before committing to a design.
After finalizing your layout, tackle the regulatory side of things. Check local site requirements and ensure your blueprint includes all the essentials: framing, plumbing, electrical, and HVAC details.
"Before you build, get with a local planner or your building department to make sure what you're doing is legal." – Tiny House For Us
If you're ready to build, platforms like Nomad Adjacent offer certified options starting at $90,000, with a lead time of 2–3 months. They also provide a free listing process and a map-based search to explore alternative living solutions. If you’re buying blueprints elsewhere, prices typically range from $129 to $1,345, depending on the complexity of the design.
Having a detailed and well-thought-out blueprint is the foundation for building a tiny home that fits your needs and lifestyle.
FAQs
What’s the difference between stationary and mobile tiny home blueprints?
Stationary tiny home blueprints are crafted for homes built on permanent foundations, such as concrete slabs, crawl spaces, or basements. These plans include essential details like footings, anchor bolts, and fixed utility connections for water, electricity, and sewer systems. Since they’re not designed to move, they often allow for larger layouts - think 500 square feet or more - and can include features like garages or basements that mobile designs simply can’t accommodate.
Mobile tiny home blueprints, however, are designed for homes built on road-legal trailers, adhering to Department of Transportation regulations. Typically, these homes are under 8 feet wide and 13 feet tall. The designs focus on lightweight materials, reinforced structures for travel, and modular utility systems like solar panels and water tanks. Because they’re built to be towed, mobile tiny homes usually feature compact layouts, often around 100 square feet or less, optimized for ease of transport.
Whether you’re planning to stay rooted or embrace life on the move, Nomad Adjacent offers blueprints and kits to suit your lifestyle.
How can I adjust a tiny home blueprint to meet local building codes?
To tailor a tiny home blueprint to meet local building codes, begin by determining the intended use of the home. Will it serve as a permanent residence, an accessory dwelling unit (ADU), or a mobile structure? This choice influences the specific regulations that apply, such as the International Residential Code (IRC) Appendix Q, which governs homes under 400 square feet.
Next, dive into your local zoning laws and building requirements. These can vary significantly by city or county and might include rules about setbacks, fire safety measures, or minimum square footage. It's crucial to understand these details upfront.
Once you've gathered the necessary information, compare your design to the applicable standards. Pay close attention to key features like ceiling height, egress windows, insulation, and stair dimensions. If adjustments are needed, modify the blueprint accordingly - this might involve resizing rooms, adding properly sized windows, or reworking loft access to ensure compliance.
After updating the design, submit your plans to the local building department for review and approval. For those looking for a streamlined start, platforms like Nomad Adjacent provide customizable tiny home kits and resources to help simplify the process.
What factors should I consider when deciding between free and paid tiny home blueprints?
When choosing between free and paid tiny home blueprints, it's important to weigh factors like detail, reliability, and customization. Free plans can be a good option if they’re well-crafted and have been successfully used by others. But paid plans often offer professional-grade drawings, precise measurements, and confirmation that the design meets local building codes.
If your budget allows, spending on a paid blueprint can offer peace of mind - especially if it comes with customer support or construction guidance. The key is to pick a plan that matches your needs, skill level, and local requirements, ensuring the building process goes as smoothly as possible.