Ultimate Guide to Ergonomic Van Layouts
Practical guide to ergonomic van layouts covering weight distribution, triangle principle, golden‑zone storage, mockups, and multi-use furniture for comfort.
Nomad Adjacenta month ago
Ultimate Guide to Ergonomic Van Layouts
When designing a van layout, the focus should be on comfort, efficiency, and safety. Every inch of space matters, and poor planning can lead to discomfort or inconvenience. Key principles include:
- Ergonomics: Design spaces to reduce strain - counter heights should match the user's height, seating should support proper posture, and heavy items must be positioned low and centered for stability.
- Triangle Principle: Keep cooking, sleeping, and storage areas close for smoother workflows.
- Weight Distribution: Place heavy items like batteries and water tanks over axles to maintain balance and fuel efficiency.
- Multi-functional Furniture: Use items like swivel seats, convertible beds, and pull-out storage to maximize limited space.
- Testing Layouts: Use tape and cardboard mockups to simulate daily tasks and identify design flaws before committing to materials.
Whether you're a solo traveler, couple, or family, tailoring your van layout to your habits and needs ensures both comfort and practicality on the road.
My Most EFFICIENT Campervan Layout YET!!! 2025 Van Tour #vanlife
sbb-itb-718b9e4
Core Principles of Ergonomic Van Design
Thoughtful design choices can make a van more comfortable and efficient for daily use while improving overall vehicle performance.
The Golden Zone and Item Placement
The Golden Zone refers to the ideal area for storing frequently used items - between your knees and shoulders - allowing you to grab what you need without unnecessary bending, stretching, or twisting. Studies show that working within this zone can reduce physical strain by up to 40% compared to reaching into less accessible areas.
To make the most of this principle, place daily essentials - like your coffee mug, phone charger, cooking utensils, or toiletries - within this easy-to-reach space. Items you use multiple times a day, such as hand tools, spices, or water bottles, should be stored between waist and shoulder height. Less frequently used items can go higher or lower. For heavy objects, keep in mind that holding a 22-pound item at arm’s length can put as much as 220 pounds of force on your lower back. Storing heavy items between knee and waist height can help reduce this strain. Features like pull-out drawers or sliding trays can make deeper storage areas more accessible. Adjust these storage heights to fit your specific needs and body type.
Once you’ve optimized item placement, the next step is managing weight distribution.
Weight Distribution and Vehicle Safety
Placing heavy items strategically is essential for both safety and vehicle performance. Heavy loads should be positioned over or between the axles to avoid rear-end sag and ensure you stay within legal weight limits. Distributing the weight evenly between the driver and passenger sides can also prevent uneven tire wear and improve fuel efficiency.
A practical approach is to separate your water and electrical systems - placing them on opposite sides of the van. This not only keeps water away from sensitive electronics but also helps maintain balance. Creating a "garage" area under a fixed bed for heavy gear like bicycles or skis can also be a smart move. Keeping these items low and centered reduces strain during loading and helps stabilize the van. Before finalizing your layout, test weight distribution using tape markers or cardboard mock-ups to ensure everything feels balanced and secure.
Creating Efficient Workflows
An ergonomic layout isn’t just about where you store items - it’s also about how you move through your space. The Triangle Principle focuses on keeping the three most-used areas - cooking, sleeping, and storage - close together to streamline your workflow.
Group related items logically: store food near the kitchen, place the water pump switch close to the sink, and position the trash bin where it’s easy to access from multiple areas. If your bed converts into another setup, make sure essentials like the toilet, light switches, and inverter are accessible whether the bed is in use or folded away. In colder climates, arrange frequently used items so you can grab them without opening doors and losing heat.
To finalize your workflow, walk through your planned layout using tape or cardboard mock-ups. This hands-on approach ensures that moving between zones feels natural and minimizes unnecessary effort or strain.
How to Design Your Ergonomic Van Layout
Evaluate Your Daily Needs and Habits
Before you start sketching your van layout, take a moment to imagine your typical day - from the time you wake up to when you go to sleep. This exercise helps you pinpoint where you’ll need essentials like light switches, power outlets, and storage spaces. Think about who will be using the van. Are you designing for solo trips, traveling as a couple, or bringing the whole family? This decision will shape everything, from the number of seats to how much storage you’ll need. If you’re planning to live in the van full-time, you’ll likely need more storage and possibly a dedicated workspace. On the other hand, a weekend getaway setup might be much simpler.
"The best camper van layout for you is going to be unique, thought out, and well considered. It is most likely not going to be something you find on social media, rather it is going to be the result of asking yourself important questions and visualizing your ideal van life."
– Eric + Colby, Engineers who Van Life
Start by making a list of needs versus wants. Do you plan to cook every day or mostly eat out? If you’ll be working remotely, consider how comfortable your desk setup will be. Write down every item you want to bring, and try the "at-home test" - if you rarely use something at home, it’s probably not worth packing. If you’re taller, choosing a high-roof van can help prevent posture issues over time. Once you’ve nailed down your essentials, it’s time to map out and test your design.
Create and Test Your Floor Plan
Your daily habits will guide the measurements and layout of your van. Start by measuring the interior of your van at three points - floor level, midway up, and at the ceiling - because curved walls mean the space isn’t a perfect rectangle. Keep in mind that adding insulation and paneling can shrink the interior by up to 2 inches on each side. Use blue painter’s tape to outline the footprint of major components like the bed, kitchen, and bathroom directly on the van floor and walls. This visual layout will help you see how much walking space you’ll have and whether you can easily access things like the toilet at night without bumping into furniture.
Take it a step further by building cardboard mockups of counters, benches, and other features using leftover boxes. Then, simulate daily tasks - chopping vegetables, working at a desk, or reaching for overhead storage. This hands-on testing will reveal any design flaws before you commit to costly materials. For example, standard counter height is about 36 inches, but you’ll want to test to see what feels comfortable for you. Similarly, seating should have a frame height of 18 inches, with an additional 3 to 5 inches for cushions, ensuring your feet rest comfortably on the floor.
"Try not to use inspiration from one single van build. I like combining ideas that I've seen from several different vans with ideas that I come up with on my own."
– Divine On the Road
Select Materials and Ergonomic Features
Once you’ve finalized your floor plan, it’s time to choose materials that are both practical and durable. Many van builders opt for 80/20 aluminum framing because it’s lightweight, adjustable, and easy to repair if needed. For seating, design benches with a slight 15-degree back angle for comfort, and add toe kicks at the base of cabinets so you can stand closer to counters without straining your feet. Swivel bases on the driver and passenger seats can turn the cab into extra living space without taking up more floor area.
Deep storage can be tricky to access, but pull-out drawers and sliding trays make it much easier. Adjustable shelving is another smart choice, allowing you to adapt your storage as your needs change. If you’re installing a composting toilet, look for a dual-purpose design that can also function as a seat or step to save space. For standard-height vans where standing isn’t an option, adding foam padding to the floor can make kneeling more comfortable for everyday tasks. Another clever idea is to install fiberglass flares on the rear panels, which can widen the van enough to fit a sideways bed, freeing up about 24 inches of floor space.
"Keep it as simple as possible; the less complicated something is, the easier and cheaper it is to fix."
– Patrick, Life in Utopia
Ergonomic Van Layout Examples
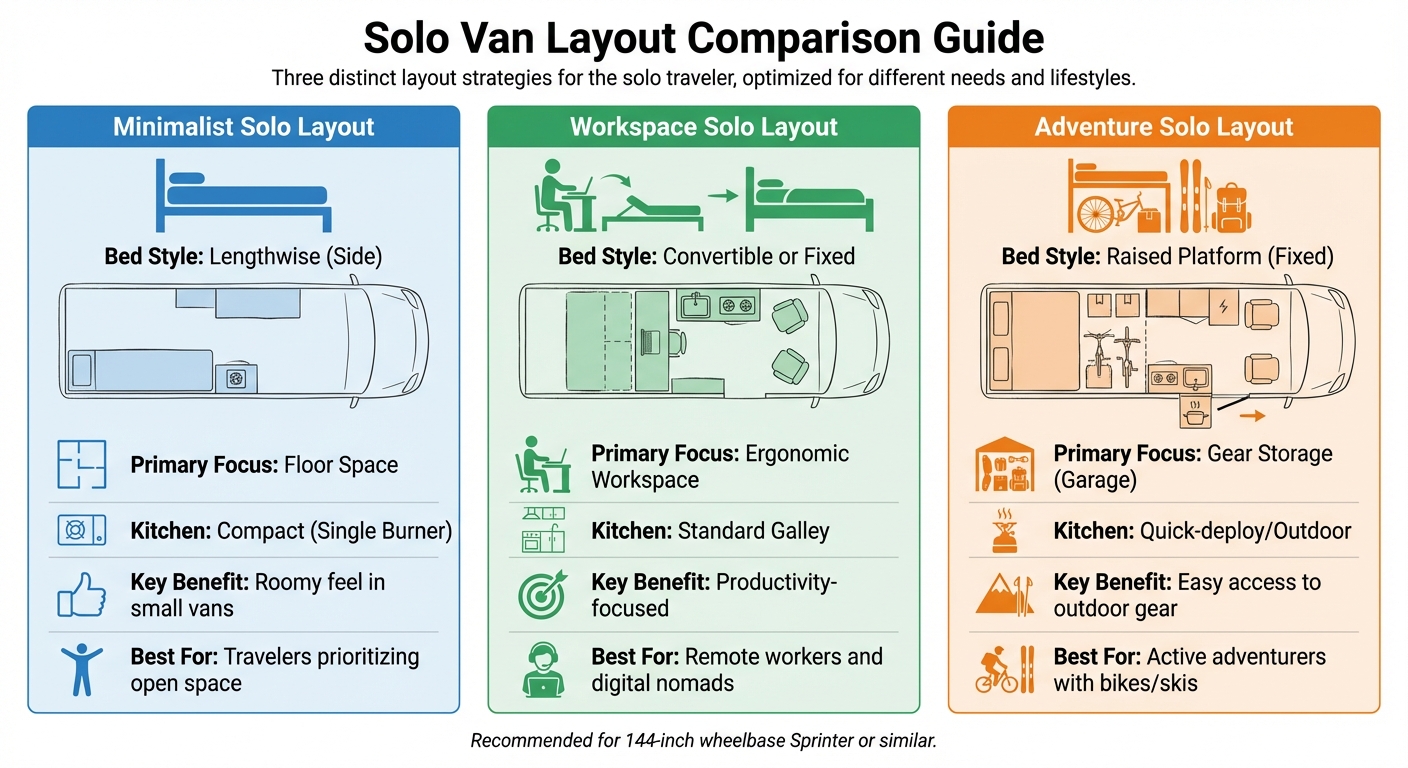
Solo Van Layout Comparison: Minimalist vs Workspace vs Adventure Designs
Solo Traveler Layouts
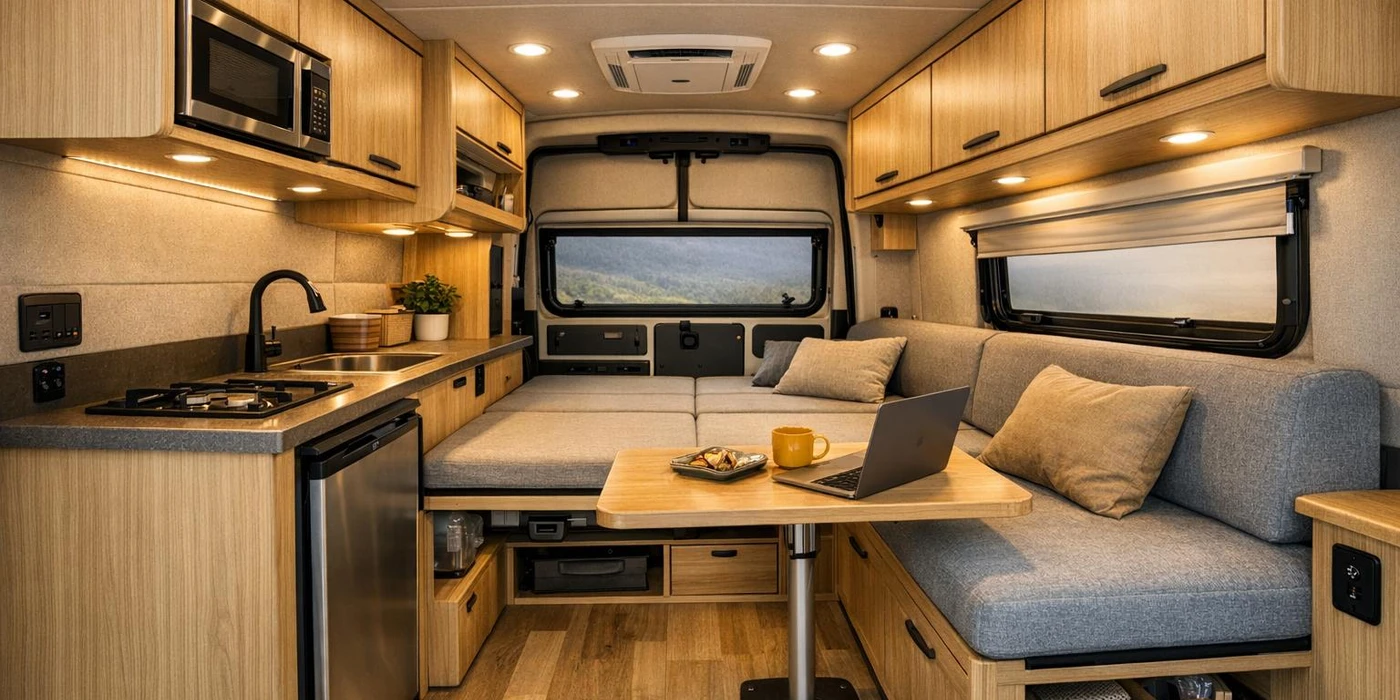
For those traveling solo, van layouts can be customized to perfectly match individual needs and habits. A smart option is placing a bed lengthwise along one side of the van. This keeps the floor space open during the day, making even smaller vans feel more spacious. A 144-inch wheelbase Sprinter often provides just enough room to include a fixed bed, a shower, and all the essentials for a solo traveler. If you’re working remotely, a convertible bed that doubles as a desk-height workspace, complete with plenty of outlets, can be a game-changer.
"Solo van life offers unique advantages - you only need to please yourself, and every layout decision can be optimized for your specific preferences and travel style."
– The Vansmith
Compact kitchens with single-burner stoves and deep, single-basin sinks are great for saving counter space, whether you're preparing meals or using the area for work. Swivel passenger seats are another handy feature, instantly creating a secondary lounge or office without taking up any extra room. For adventurers, raised platform beds with built-in storage are ideal for keeping gear organized while leaving the main living area open.
| Feature | Minimalist Solo Layout | Workspace Solo Layout | Adventure Solo Layout |
|---|---|---|---|
| Bed Style | Lengthwise (Side) | Convertible or Fixed | Raised Platform (Fixed) |
| Primary Focus | Floor Space | Ergonomic Workspace | Gear Storage (Garage) |
| Kitchen | Compact (Single Burner) | Standard Galley | Quick-deploy/Outdoor |
| Key Benefit | Roomy feel in small vans | Productivity-focused | Easy access to outdoor gear |
Couples and Small Family Layouts
When sharing a van, balancing personal space with communal areas becomes key. Multi-functional U-shaped lounges are a popular choice - they provide seating during the day and transform into beds at night. Families with kids can benefit from zoned living spaces, such as bunk beds for children in one section and a separate sleeping area for adults. Adding body flares to the van’s rear can widen the interior enough for a wall-to-wall bed, freeing up as much as two feet of floor space.
For those needing more room, a 170-inch wheelbase Sprinter offers about 3.5 extra feet of buildable space compared to the 144-inch model. This additional space can be used for dedicated work areas or extra storage. Swivel passenger seats with pop-up tables make for flexible workspaces without sacrificing living areas. Couples with a lot of outdoor gear may prefer a fixed bed layout, which allows for a large storage area underneath. On the other hand, a convertible dinette offers a more open and airy feel, seating up to five or six people, though it does require daily setup.
Social and Group-Friendly Layouts
If your travels involve hosting friends or traveling with a group, a U-shaped lounge at the back of the van is a great option. It can comfortably seat up to five people for meals or game nights. At night, this lounge converts into a large bed, though the setup requires daily reconfiguration and offers less built-in storage compared to fixed-bed layouts. Swivel front seats can help integrate the cab into the living space, creating an open-floor plan that feels more like a cozy studio apartment.
For longer vans, such as a 170-inch Sprinter, an elevator bed system can be a game-changer. This setup allows the bed to rise to the ceiling during the day, leaving the floor open for socializing. Pop-top roofs are another excellent addition, providing extra sleeping space upstairs while keeping the main floor free for standing room and seating. Modern pop-tops, like the Cloud Cap, even support features like air conditioning and solar decks, making them practical for all-season use. For added flexibility, aeronautical tracks on the floor allow you to add or remove seats as needed, ensuring the van is functional for both group trips and solo adventures.
| Feature | Social Benefit | Ergonomic Trade-off |
|---|---|---|
| U-Lounge | Seats 5 people; ideal for hosting | Requires daily conversion to a bed; limits built-in storage |
| Swivel Seats | Integrates cab for extra seating | May reduce privacy and limit bulkhead space |
| Elevator Bed | Keeps lounge available 24/7 | High complexity; typically requires a high-payload vehicle |
| Pop-Top | Provides additional sleeping space upstairs | Less stealthy and may lead to heat loss in colder climates |
Advanced Ergonomic Features
Improving your van's comfort and efficiency goes beyond the basics. Advanced ergonomic features can make a significant difference in how you use and enjoy your space.
Adjustable and Multi-Purpose Furniture
Once the essentials are in place, adding multi-functional furniture can transform your van's interior. For instance, Murphy beds fold against the wall during the day, while suspended or lifting beds can be raised to the ceiling, freeing up valuable floor space for work or socializing. These systems often operate manually using ratchet straps or pulleys and require sturdy support in the walls or ceiling. Families may benefit from bunk bed systems that stack up to four single beds in a compact area or from specialized kid beds installed above cab seats.
Convertible furniture, like dinettes and benches, remains a practical way to save space. These pieces can easily switch from seating to sleeping arrangements without adding unnecessary bulk. When designing benches, ensure the cushions and frames allow for comfortable foot placement. Even appliances can serve dual purposes - chest-style refrigerators can double as seating, and shower enclosures can be designed to function as benches when not in use.
"Efficiency and multi-purpose is the name of the game for camper vans. When you live in 80 sq feet, every inch matters..."
– Eric + Colby, Engineers who Van Life
Flexible workspaces are another smart addition. Tables that fold down, swivel, or include drop-leaves can create functional areas for work or dining. Just make sure that essential components like light switches, toilets, and inverter toggles remain accessible in all configurations. Pre-made options, such as the Flatline Van Co Adventure Van Solo Bed starting at $1,195 or full Sprinter van bed systems priced between $2,250 and $2,350, can provide inspiration. Pairing adaptable furniture with thoughtful lighting can further enhance the usability of your van.
Lighting and Visibility Solutions
Good lighting is essential for making the most of your versatile furniture setup. Place light switches near entrances and beds to ensure they’re easy to reach, even when the layout changes.
Natural light plays a big role in making a van feel open and less confined. Adding windows or skylights can reduce the need for artificial lighting during the day while creating a more inviting atmosphere. In task-specific areas like the kitchen or workspace, targeted lighting can improve visibility and reduce eye strain. Open shelving with subtle wooden bars can also enhance the sense of space while keeping items secure and easy to find.
For added convenience, many van conversions now include app-controlled lighting systems. These allow you to adjust brightness remotely and set mood lighting for evening relaxation. Positioning swivel seats near windows or other primary light sources can also create a comfortable, well-lit mobile office. Always prioritize safety when installing electrical components, keeping wiring away from fuel or gas sources.
Sound and Temperature Management
Once your lighting and furniture are optimized, consider the acoustic and thermal comfort of your van. A quiet, temperature-controlled environment can make a world of difference during your travels. Effective soundproofing involves reducing vibrations and absorbing airborne noise. To identify areas that need attention, tap on the van's panels - boomy tones indicate a need for more damping, while dull tones suggest less is required. Covering 25–50% of a panel with butyl mats is often enough to significantly reduce noise.
"A rattling van that offers no protection from road or outdoor noise can quickly make an ordeal out of a pleasant road trip."
– Shane, Founder of The Van Conversion
Pay special attention to wheel arches, as they are closest to tire noise. Using butyl mats with 50–75% coverage, combined with high-NRC insulation, can be particularly effective in these areas. For temperature control, address metal frames and pillars, which act as thermal bridges and allow heat to bypass insulation. Adding a thermal break with materials like Low-E or EZ-Cool can help prevent unwanted heat transfer. Instead of using a full vapor barrier, opt for breathable, hydrophobic insulation materials like 3M Thinsulate (R-value of 5.2 at about $1.70 per square foot) or Havelock Wool (R-value of 7.2 for a 2-inch thickness at around $1.50 per square foot).
Properly installed soundproofing can reduce interior noise by 5–15 dB. For floors, rigid foam boards like XPS are ideal for handling compression, while soft, fibrous materials like Thinsulate or wool work best in walls and cavities to maximize sound absorption. Be cautious not to over-compress porous insulation behind wall panels, as this can reduce both noise reduction and thermal efficiency. To combat heat loss through windows, consider custom-fit insulated covers made from Reflectix or Low-E materials layered with fabric. These can significantly improve insulation, especially in colder conditions.
Conclusion
When planning your van layout, prioritize your specific needs while keeping ergonomic principles in mind. For stability, place heavy items like water tanks and batteries low and centered over the axles. Organize your key areas - cooking, sleeping, and storage - using the triangle principle to reduce unnecessary movement in your limited space. As Eric and Colby from The Engineers Who Van Life put it, “The best camper van layout for you is going to be unique... the result of asking yourself important questions and visualizing your ideal van life”. In other words, your design should reflect your personal vision.
Before committing to your build, test your design with simple mockups. Adjust features like counter heights and bench designs to ensure proper posture and comfort. Don’t forget practical details like toe kicks at the base of cabinets to enhance usability. These considerations will help guide your decisions as you refine your layout.
Whether you’re crafting a minimalist setup for solo adventures or a more versatile design for family travel, these principles can work for anyone. The goal is to create a functional and comfortable space that meets your needs while making the most of your compact living area.
For more ideas and resources, check out Nomad Adjacent’s collection of converted vans and custom build tools. Their platform offers a free listing process and map-based search, making it easy to connect with sellers who’ve already solved many of the ergonomic challenges you might encounter.
FAQs
What’s the best way to design a van layout for comfort and functionality?
Designing a van layout that’s both comfortable and functional starts with thoughtful planning. Begin by identifying your top priorities - whether it’s a cozy sleeping area, a practical kitchen, a workspace, or the ability to live off-grid. Think about who will share the space with you, whether it’s just you, a partner, or even a family. To avoid overcrowding, make a list of must-haves and nice-to-haves, focusing on essentials first.
Take precise measurements of your van’s interior and sketch out a basic layout. You can even use painter’s tape on the floor to map out spaces for sleeping, cooking, and storage. Aim to keep the aisle at least 24 inches wide for easy movement, and position heavier items low and close to the center for better weight balance. Features like a convertible bed or modular storage can help you make the most of your limited space while keeping things versatile.
For everyday convenience, ensure that utilities like light switches, inverters, and toilets are easy to access no matter how the van is configured. Place the kitchen near the power source to minimize wiring, and make use of vertical storage or slide-out drawers to maximize every inch. If you’re planning to use the van for weekend getaways or full-time living, choosing the right size is key - a short-wheelbase van is easier to maneuver, while a long-wheelbase model provides more room.
For more ideas and helpful tips on minimalist and alternative living, check out Nomad Adjacent. It’s a great resource for finding the right van and designing an ergonomic layout tailored to your needs.
How can I distribute weight effectively in my van for better safety and performance?
Proper weight distribution is essential for keeping your van safe and functioning efficiently. Start by identifying your van's Gross Vehicle Weight Rating (GVWR). Subtract the curb weight (the weight of the van without passengers or cargo) to figure out the maximum payload you can safely carry. This payload includes everything - permanent fixtures like water tanks and batteries, as well as any removable gear. Staying within this limit is critical.
When loading your van, place heavier items like batteries or water tanks as close to the van's centerline as possible and position them low to the floor. This helps maintain a lower center of gravity, which improves stability. Additionally, aim to balance the load between the front and rear axles. Ideally, about half the weight should sit ahead of the rear axle and the other half behind the front axle. Don’t forget to secure all items tightly to prevent them from shifting during travel.
It’s a good idea to regularly check your van’s weight, particularly after adding or removing gear, to ensure you're still within safe limits. Following these practices not only keeps your van safe on the road but also helps it handle predictably and reduces wear on its parts.
How can I test my van layout before starting the build?
To try out your van layout before diving into the build, start by measuring the interior dimensions of your van in feet and inches (e.g., 7 ft × 4 ft × 6 ft high). Use these measurements to sketch a floor plan, either on graph paper or with a free online design tool. This helps you visualize how the space will come together. Next, create a life-sized mock-up using simple materials like cardboard or foam board to represent key elements such as the bed, kitchen, and storage areas. Secure these pieces to the van floor to get a real feel for the layout.
Once your mock-up is in place, walk through it and test everyday activities like sitting, lying down, and reaching into storage areas. Adjust as needed to make sure the space is comfortable and practical for your needs. If you want to refine the design even further, try using a 3D modeling tool to catch any potential issues you might have missed. When everything feels just right, you can confidently move forward with your build.
Tip: Still looking for the right van to start your project? Check out Nomad Adjacent, a free platform that lets you browse and compare converted vans and other alternative living setups across the U.S.