DIY Tiny Home Plumbing: Step-by-Step Guide
Step-by-step DIY tiny home plumbing: plan layouts, choose on- or off-grid, install PEX, set proper drainage slopes, connect fixtures, test and insulate.
Nomad Adjacent3 months ago
DIY Tiny Home Plumbing: Step-by-Step Guide
Setting up plumbing in a tiny home might seem challenging, but with the right tools, materials, and planning, it’s entirely manageable. Whether you're building a stationary or mobile setup, this guide walks you through the essentials:
- Decide between on-grid or off-grid systems: On-grid connects to city utilities, while off-grid uses tanks and pumps for flexibility.
- Plan fixture placement: Group fixtures like the kitchen sink and shower to reduce materials and simplify repairs.
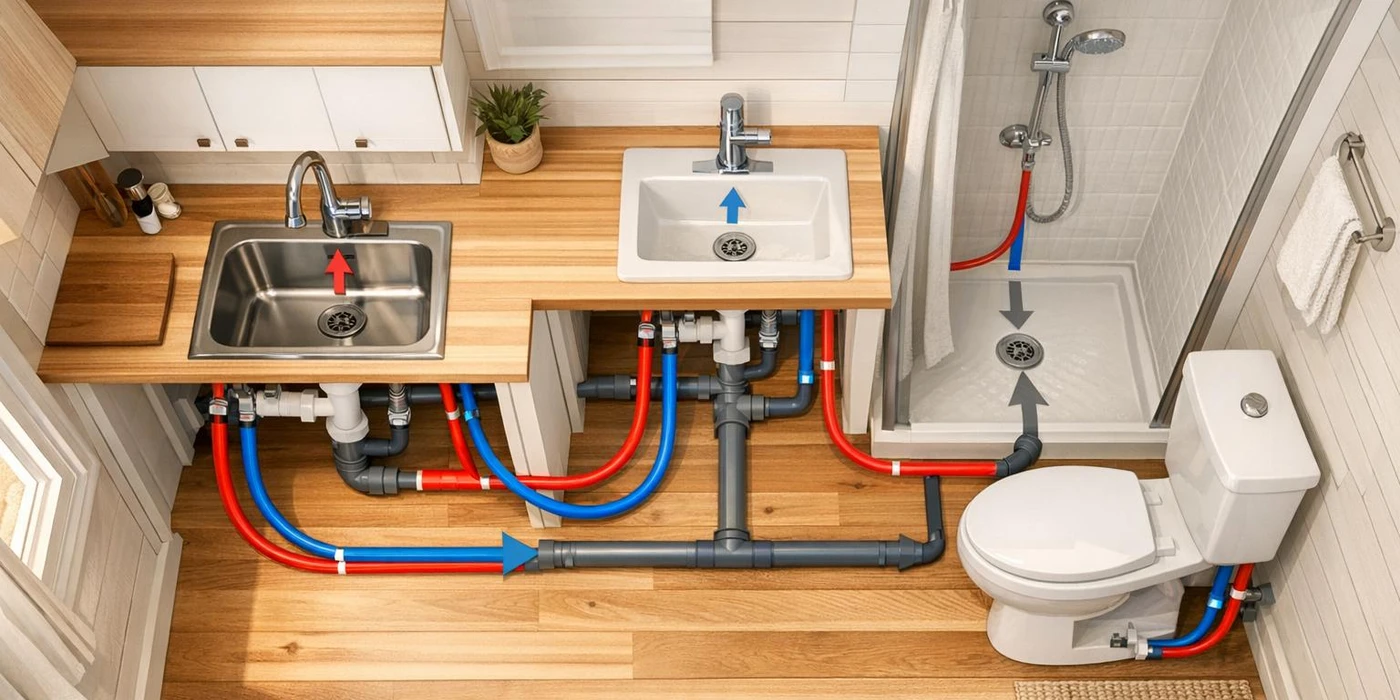
- Use PEX tubing for water lines: It's flexible, freeze-resistant, and color-coded for hot (red) and cold (blue) water.
- Ensure proper drainage: Maintain a 1/4-inch slope per foot for PVC or ABS pipes to prevent clogs.
- Budget carefully: Materials typically cost $350–$1,500, with additional expenses for water heaters or septic systems.
Planning Your Plumbing System
Mapping Fixture Locations
Grouping fixtures together is a smart way to save money, simplify installation, and make future repairs less of a hassle. For instance, placing high-water-use fixtures like the shower and kitchen sink close to each other can cut down on the amount of plumbing work required. A great strategy is to position these fixtures on opposite sides of the same interior wall, allowing them to share plumbing lines.
"The biggest tip I'd give is to have your shower and kitchen sink be as close to each other as possible. If you have the shower on one side of an interior wall and the sink on the other side of that same wall, you'll save a lot of extra work." – Ryan Mitchell, Founder, The Tiny Life
If you're building on a trailer, pay attention to the placement of the beams. Drain lines will need to pass through the floor without hitting any structural components. Weight distribution is another key factor - heavy items like water tanks should be positioned directly over the trailer axles to ensure safe towing. Additionally, placing the main water inlet near the kitchen and bathroom areas can minimize the amount of PEX tubing you'll need. These considerations will also help you decide whether an on-grid or off-grid setup is the better choice for your build.
Choosing On-Grid or Off-Grid Systems
Once you've mapped out your layout, it's time to choose between an on-grid or off-grid plumbing system. This decision largely depends on how mobile you want your setup to be and where you plan to park. On-grid systems connect to municipal water and sewer lines, providing reliable water pressure, but they limit your parking options. On the other hand, off-grid systems rely on onboard tanks, giving you the flexibility to live remotely or travel. However, they require you to manually monitor water levels and manage waste.
Waste management options vary depending on your choice. For on-grid systems, standard flush toilets connect to sewer or septic systems. Off-grid setups might involve composting toilets, incinerating toilets, or RV-style flush toilets with holding tanks. Keep in mind, connecting to city utilities can be costly, with tap fees reaching up to $11,582 and septic system installations starting at $5,000.
Designing Water Line and Drainage Paths
PEX tubing is the go-to choice for supply lines due to its flexibility, resistance to freezing, and ease of installation. It's also color-coded - red for hot water and blue for cold - making the process more straightforward and troubleshooting much easier. For example, a 1/2-inch PEX tube requires a minimum bend radius of 5 inches to avoid kinks.
For drainage, use 2-inch PVC or ABS pipes and maintain a slope of 1/4 inch per foot to prevent clogs. If the slope is too shallow, water can back up, while overly steep slopes might cause liquids to flow too quickly, leaving solids behind. In cases where traditional roof vents aren't feasible, an air admittance valve (AAV) offers a practical alternative, eliminating the need for roof penetrations. If you're building on a trailer, secure drain pipes with hangers to prevent shifting or sagging during travel. These design choices lay the groundwork for a smooth installation process, which will be covered in the next section.
Tools and Materials You'll Need
Required Tools
Having the right tools can make all the difference when tackling plumbing projects. For working with PEX supply lines, you’ll need a PEX pipe cutter (about $9.71) to create clean, square cuts, and a deburring tool (around $11.56) to smooth the edges before inserting them into fittings. If you’re using push-to-connect fittings like SharkBite, a SharkBite removal tool is a must for disconnecting and reusing fittings in case of errors.
For structural work, a hole saw kit or jigsaw will help you cut through subfloors for pipe routing. You’ll also need a 3/4-inch augur bit with an impact driver to drill through wall studs. An adjustable wrench set is crucial for tightening threaded fittings, while a measuring tape and torpedo level ensure your drain lines maintain the proper 1/4-inch per foot slope. Don’t forget safety gear - wear gloves and goggles to protect yourself during the project. Additionally, metal safety plates are essential for safeguarding studs where PEX lines pass through.
Materials List
Here’s what you’ll need to gather for your plumbing setup:
- PEX tubing: Use color-coded rolls - red for hot water and blue for cold. A 50-foot roll costs between $30 and $50. For a typical tiny home, plan on purchasing 100 feet total (50 feet of each color).
- Push-to-connect fittings: SharkBite elbows (around $10.28 each) and tees ($13.45 each) are ideal for DIYers since they eliminate the need for soldering or crimping.
- Drainage pipes: Opt for 2-inch PVC or ABS pipes, which cost between $20 and $40 for a basic system. You’ll also need PVC primer and cement for gluing joints, and plumber’s tape (Teflon) for threaded connections.
- Potable water hose: If you’re off-grid, use a drink-safe RV white hose for water intake instead of a garden hose, which can leach chemicals.
- Foam pipe insulation: Protects pipes from freezing.
- Silicone caulk: Seals fixture connections.
- Main ball valve: Allows for emergency shut-offs.
Budgeting for DIY plumbing? Expect costs to range from $351 to $1,580, with an additional $500–$1,000 if you’re adding a tankless water heater.
How to Plumb a Tiny House - On Grid and Off-Grid
sbb-itb-718b9e4
Installation Steps
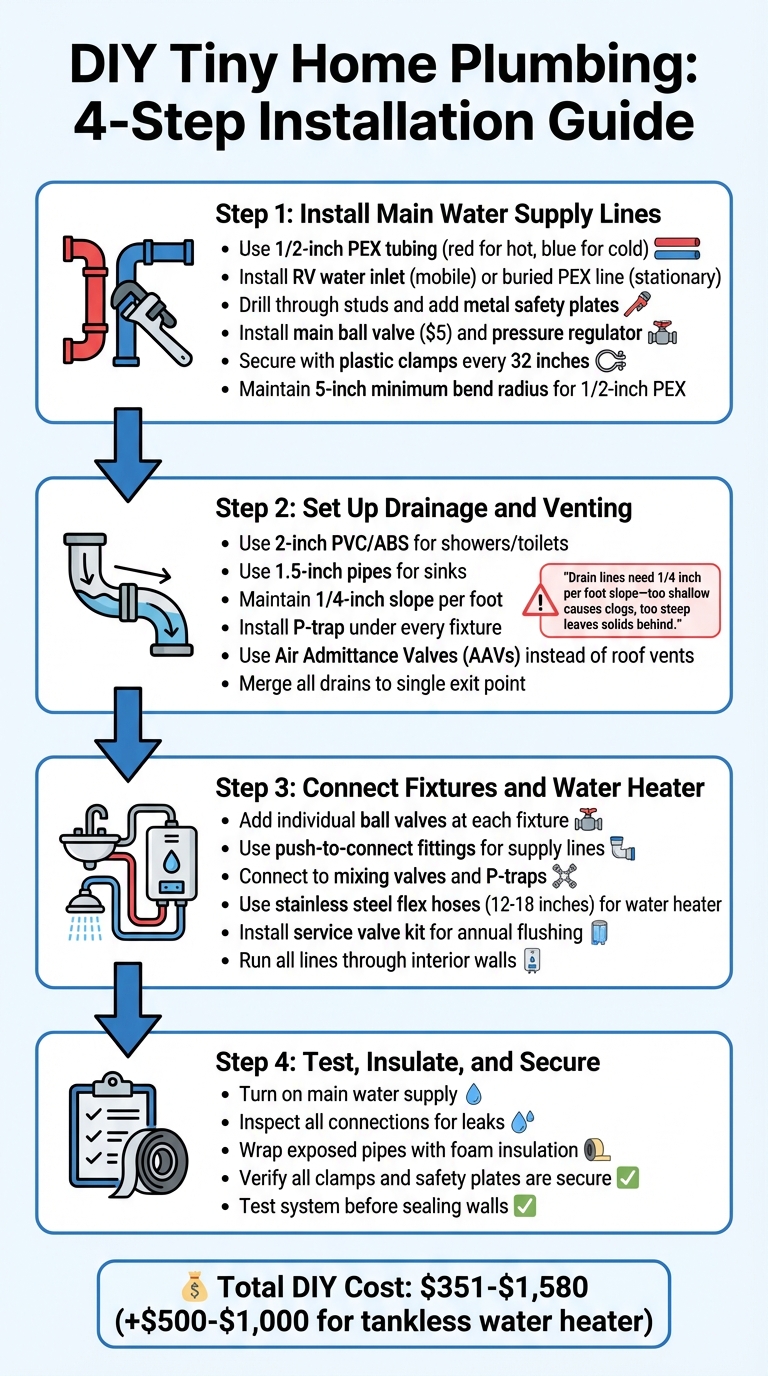
4-Step DIY Tiny Home Plumbing Installation Process
Step 1: Install Main Water Supply Lines
Begin by identifying where your water will enter the home. For mobile tiny homes, an RV water inlet installed on the exterior wall works best. This setup uses a potable hose, making it easy to disconnect when you move. If your tiny home is stationary, run a buried PEX line that enters from underneath - this helps protect it from freezing temperatures.
Use 1/2-inch PEX tubing for your supply lines, with red for hot water and blue for cold. The ideal time to install these lines is after framing but before adding insulation. Drill holes through studs with the appropriate bit, thread the PEX tubing, and cover the studs with metal safety plates where pipes pass through. These plates protect the pipes from accidental damage caused by drywall screws.
When cutting PEX, use a dedicated cutter to ensure clean, square ends, and smooth out any rough edges with a deburring tool. Uneven cuts are a common cause of leaks in push-to-connect fittings. To avoid kinks, maintain a minimum bend radius of 5 inches for 1/2-inch PEX, or use 90-degree elbow fittings in tight spaces. At the supply line's entry point, install a main ball valve (about $5) and add a pressure regulator to prevent water surges. Secure the PEX lines with plastic clamps every 32 inches to reduce the risk of water hammer.
With your main supply lines in place, you can move on to planning drainage and venting.
Step 2: Set Up Drainage and Venting
Before cutting into the subfloor, map out the paths for your drain lines. Use 2-inch PVC or ABS pipes for showers and toilets, and 1.5-inch pipes for sinks. Keep a slope of 1/4-inch per foot on horizontal runs for proper drainage.
"Drain lines need to be sloped in a very specific way - ¼ of an inch per foot. Too shallow of a slope and you'll have clogs, but too steep and your solids will not drain." – Ryan Mitchell, founder of The Tiny Life
Ensure your tiny home is perfectly level before finalizing the plumbing. Install a P-trap under every sink and shower to prevent sewer gases from entering your living space. Secure all PVC joints using primer and cement. For venting, you can opt for Air Admittance Valves (AAVs) instead of traditional roof vents. These compact, one-way valves eliminate the need for roof penetrations. Finally, merge all drain lines into a single exit point on the trailer's side, allowing for easy connections to RV sewer hoses or septic systems.
Step 3: Connect Fixtures and Water Heater
Add individual ball valves at each fixture - like sinks, showers, and toilets - so you can perform maintenance without shutting off water to the entire home. Use push-to-connect fittings to attach supply lines to fixtures. For sinks and showers, connect the supply lines to the mixing valve and attach the drain to the corresponding P-trap.
When connecting to a tankless water heater, avoid attaching PEX directly. Instead, use corrugated stainless steel flex hoses for the first 12–18 inches to handle heat and vibration. Install a service valve kit on the water heater to make it easy to flush out sediment annually, which is crucial for maintaining efficiency and keeping the warranty intact. To prevent freezing in winter, run all plumbing lines through interior walls or within the heated parts of your home.
Once all fixtures and the water heater are connected, proceed to testing and securing your setup.
Step 4: Test, Insulate, and Secure
Turn on the main water supply and inspect every connection, from the inlet to the fixtures, for leaks. If you spot a leak at a push-to-connect fitting, disconnect it using the proper removal tool, check that the PEX end is square and deburred, and reconnect it.
After confirming there are no leaks, wrap all exposed pipes with foam pipe insulation to guard against freezing - especially for lines near exterior walls or in unheated areas. Lastly, double-check that all clamps and safety plates from earlier steps are securely in place.
Safety Tips and Best Practices
General Safety Precautions
After installation, keeping safety top of mind is essential.
Start by shutting off the main water supply before beginning any work. When cutting materials like PEX or PVC, wear eye protection to guard against flying debris. If you're soldering copper fittings or working in areas with potential mold, use a respirator to protect your lungs. Always use sharp tools to reduce the chance of slipping, and cut away from your face and body to avoid accidental injuries.
If you're using power tools near water, make sure they're plugged into a Ground Fault Circuit Interrupter (GFCI) outlet for added protection. If you notice a tingling sensation when touching metal pipes, stop working immediately - this could indicate an electrical grounding issue. For tasks involving sewage lines or contaminated areas, wear gloves, protective coveralls, and waterproof boots. Be sure to wash your hands thoroughly with soap and water after handling waste materials.
Meeting Local Building Codes
Before starting construction, check with your local building department to find out whether your tiny home is classified as an RV or a permanent dwelling. This distinction determines which plumbing codes you'll need to follow. For example, in California, Appendix R - specific regulations for tiny house plumbing - will be in effect starting January 1, 2026.
Even for DIY plumbing projects, permits and professional inspections are typically required to ensure safety and compliance. Verify whether Air Admittance Valves (AAVs) are allowed in your area, as some jurisdictions require traditional through-the-roof venting instead. Once your system is in place, pressure test all joints as outlined earlier, then schedule inspections to confirm compliance. Additionally, look into local greywater regulations. Some areas permit greywater use for irrigation if eco-friendly soaps are used, while others require all wastewater to be directed to sewer or septic systems. Taking these steps ensures your plumbing system is both compliant and safe.
Conclusion
Setting up plumbing for a DIY tiny home is entirely doable with careful planning and smart choices. Ryan Mitchell, founder of The Tiny Life, emphasizes the importance of preparation: "An hour of planning ahead will save you a ton of time down the road, not to mention a lot of headaches". The process starts with thoughtful layout design - placing fixtures strategically, like grouping the kitchen and shower on opposite sides of the same wall to share plumbing lines. Don’t forget to maintain a drainage slope of 1/4 inch per foot for proper water flow. This groundwork ensures smoother installation down the line.
When it comes to materials, opt for durable options like PEX, which can withstand the movement of a mobile home. Pressure test the system before sealing up the walls, and use color-coded lines (red for hot water, blue for cold) to simplify maintenance. Installing a main shut-off valve is another must for easy repairs. If your tiny home is mobile, consider distributing water tank weight over the axles to maintain balance and stability.
FAQs
What’s the difference between on-grid and off-grid plumbing in tiny homes?
When it comes to tiny homes, plumbing systems fall into two main categories: on-grid and off-grid, each with its own setup and benefits.
On-grid plumbing connects directly to municipal utilities, making it straightforward and low-maintenance. With this system, water is supplied by the city, so you’ll only need minimal equipment like a pressure-regulating valve. Wastewater is sent directly into public sewer lines, meaning there’s no need for on-site storage tanks or complex filtration systems. However, the big trade-off is mobility - your tiny home needs to stay close to utility hookups.
Off-grid plumbing, on the other hand, is completely independent. Water comes from sources like wells, rain, or streams and is stored in tanks, often ranging from 50 to 100 gallons. A pump and pressure tank ensure water flows to your fixtures. For waste management, solutions like composting toilets, graywater recycling systems, or portable tanks (emptied at designated dump stations) are used. To make the water safe to drink, off-grid setups often include filtration or UV treatment systems. While these systems require a bigger upfront investment and are more complex to manage, they provide unparalleled freedom from utility connections.
If you’re in the market for a tiny home, Nomad Adjacent can help. Their listings clearly indicate whether homes are designed for on-grid or off-grid living, making it easier to find one that matches your lifestyle.
How do I ensure the right drainage slope for plumbing in my tiny home?
Proper drainage is key to keeping your tiny home's plumbing running smoothly and avoiding clogs. The slope of your pipes plays a big role in this. As a rule of thumb, pipes that are 2 inches or smaller should have a ¼ inch per foot slope, while larger pipes need a ⅛ inch per foot slope. To get this right, use tools like a level or a laser to measure and mark the slope from the fixture to the vent stack.
Make sure to secure the pipes with supports every 4 to 6 feet, adjusting as necessary to maintain a consistent slope. Before sealing everything up, test the system by running water through the pipes to check for any dips or pooling. If you're leaning toward a pre-designed tiny home, platforms like Nomad Adjacent offer plumbing-ready models that already meet these standards, saving you time and hassle.
What tools and materials do I need to install PEX tubing in a tiny home?
To set up PEX tubing in a tiny home, you'll need a handful of essential tools and materials to get the job done right:
- PEX tubing: A flexible and sturdy pipe suitable for both hot and cold water lines.
- PEX fittings: These include options like crimp, clamp, or push-fit fittings to connect sections and attach fixtures securely.
- PEX cutter: A specialized tool that ensures clean, precise cuts without damaging the tubing.
- Crimping or expansion tool: Necessary for securing connections, whether you're using crimp rings or expanding the tubing for push-fit fittings.
- Pipe clamps or supports: Items like brackets, zip ties, or clamps to hold the tubing in place and maintain proper spacing.
You might also find a deburring tool or utility knife handy for smoothing out rough edges after cutting the tubing. With these tools on hand, you can build a dependable and efficient plumbing system for your tiny home.