How to Convert a Van into a Livable Home: Step Guide
Transform your van into a cozy home with our step-by-step guide covering planning, tools, and essential features for van life.
Nomad Adjacent3 months ago
How to Convert a Van into a Livable Home: Step Guide
Converting a van into a livable home combines housing and transportation into one compact, mobile solution. It’s a practical way to save money, reduce clutter, and gain the freedom to travel. This guide breaks down the process into clear, actionable steps:
- Choose the Right Van: Popular options include the Ford Transit (affordable and reliable), Mercedes Sprinter (spacious but higher maintenance), and Ram ProMaster (lower floor and easier entry). Consider costs like insurance and registration.
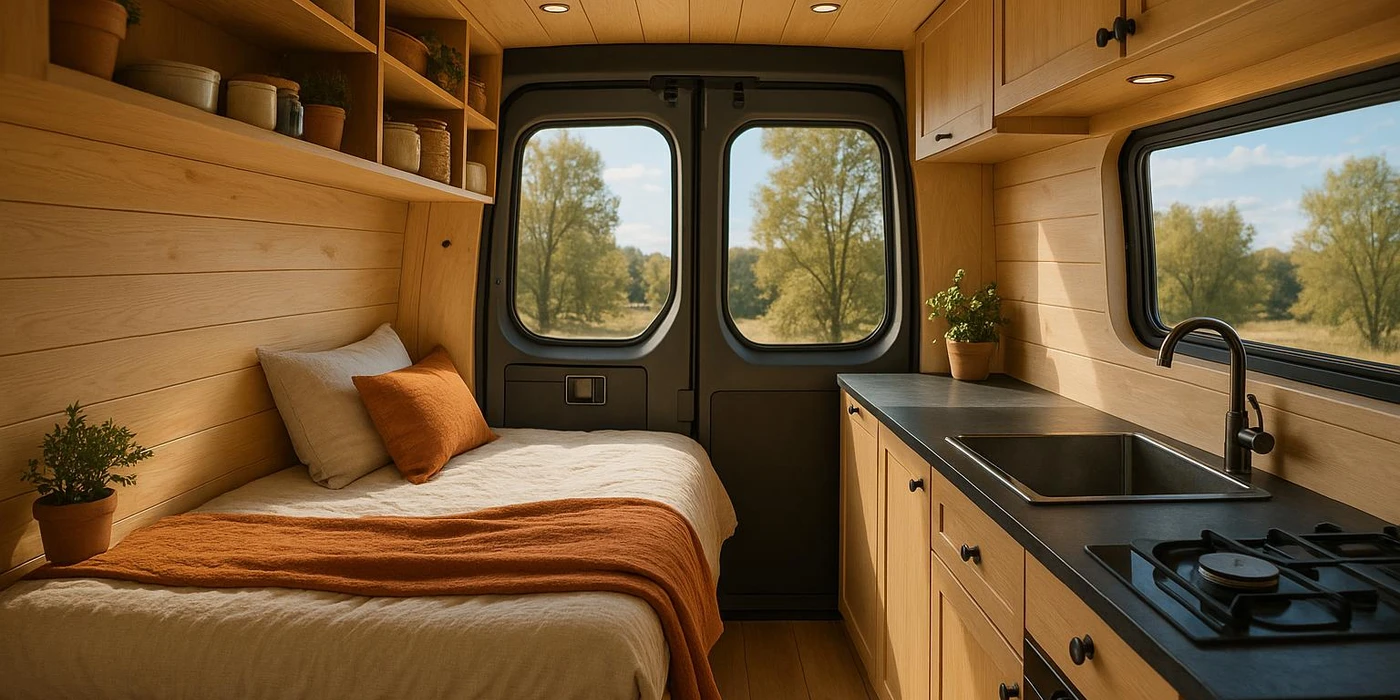
- Plan Your Layout: Define zones for sleeping, cooking, and storage. Fixed beds save time, while convertible setups maximize space. A galley-style kitchen is efficient and practical.
- Gather Tools and Materials: Essential tools include drills, saws, and safety gear. Key materials include insulation (foam boards, Reflectix), plywood for flooring, and electrical components like LED lights and wiring.
- Step-by-Step Build:
- Insulation and Flooring: Clean and treat the van floor, install foam insulation, and secure plywood subfloor.
- Electrical and Water Systems: Install wiring, batteries, and plumbing for sinks and tanks.
- Interior Customization: Add cabinets, lighting, and storage tailored to your lifestyle.
- Test and Finalize: Do a trial run to ensure all systems work, check for leaks, and secure furniture for safe travel.
Converting a van requires planning, effort, and basic DIY skills, but the result is a functional, mobile home tailored to your needs. Whether for full-time living or weekend adventures, this lifestyle offers flexibility and cost savings.
I Built My Dream Camper Van | Full Build Step by Step
Planning Your Van Conversion
Turning a van into a cozy, functional home on wheels starts with a solid plan. This step is crucial - it’s what separates a smooth, successful project from a costly, frustrating experience. By carefully selecting the right van, understanding your priorities, and designing a thoughtful layout, you can save time, money, and a lot of stress.
Choosing the Right Van
Your choice of van shapes the entire conversion process. Popular models like the Ford Transit, Mercedes Sprinter, and Ram ProMaster each bring their own perks and challenges, so it’s important to weigh your options.
- Ford Transit: Known for its reliability and affordability, the Transit is a favorite among DIY converters. It’s widely available, and since many mechanics are familiar with it, maintenance is relatively straightforward. Plus, it comes in various configurations, including high-roof models that offer plenty of headroom.
- Mercedes Sprinter: If you’re after a premium feel and lots of interior space, the Sprinter might be your pick. However, it’s worth noting that maintenance costs can be higher, and finding service centers may be trickier.
- Ram ProMaster: This van stands out with its front-wheel-drive design, which gives it a lower floor for easier entry. While its engine placement might slightly limit interior space, it often makes for a smoother conversion experience.
Don’t forget to factor in costs beyond the sticker price. Registration and insurance can add up, especially since converted vans are often classified as commercial vehicles initially. Insurance rates will depend on your coverage needs and driving history, so it’s worth shopping around.
Defining Your Living Needs
Think about how you’ll use your van - whether it’s for full-time living or occasional weekend getaways - and plan accordingly.
- Sleeping Arrangements: Decide between a fixed bed and a convertible setup. A fixed bed offers a consistent, ready-to-use sleeping space, while a convertible dinette-to-bed system can free up valuable room during the day.
- Cooking Setup: Consider your cooking habits. If you’re planning simple meals, a small stove and mini fridge might suffice. But if you love cooking, you’ll want more counter space, a larger refrigerator, and extra storage for cookware.
- Water and Power Systems: Your level of independence will guide these decisions. Basic setups can handle LED lights and phone charging, but running appliances like laptops or refrigerators calls for a more robust system.
- Storage: Tailor storage to your lifestyle. Outdoor enthusiasts might need space for gear like bikes or kayaks, while remote workers should prioritize organized areas for electronics and office supplies.
Creating a Layout Plan
A well-thought-out layout makes all the difference in how functional and comfortable your van feels.
Start by taking precise measurements of the interior, paying attention to details like wheel wells and ceiling height variations. Walls often curve, which can impact where you place built-ins or seating areas.
Sketch out a floor plan, dividing the space into zones like sleeping, cooking, and storage. Mark these areas on the floor to visualize how everything fits. Many van lifers opt for a galley-style kitchen, which maximizes efficiency while leaving room for living and storage.
Carefully plan where key elements will go. Beds are often positioned at the rear for privacy, while placing the kitchen near a door improves ventilation and accessibility. Storage can take the form of overhead cabinets, under-bed compartments, or a mix of both - whatever suits your needs best.
Once your plan is in place, you’ll be ready to gather the tools and materials to bring your vision to life.
Tools and Materials You'll Need
Having the right tools and materials can make your van conversion smoother and help you stay on track. You can find most of these essentials at stores like Home Depot, Lowe's, or Harbor Freight Tools.
Tools for DIY Van Conversion
Power Tools
Power tools are the backbone of any van conversion project. A cordless drill is perfect for creating pilot holes, a circular saw handles plywood and lumber cuts, and a jigsaw is ideal for making more precise, intricate cuts. Take some time to compare features and prices to find tools that fit your needs.
Hand Tools
Don't overlook the importance of hand tools for detailed tasks. A sturdy tape measure is essential for working in the tight confines of a van. Levels - both standard and torpedo - will ensure your installations are straight and aligned. A sharp utility knife is another must-have for cutting insulation or marking materials.
Safety Equipment
Safety should always come first. Use safety glasses to shield your eyes from flying debris and wear work gloves to protect against cuts and splinters. In small, enclosed spaces, a dust mask or respirator is crucial when working with materials that release dust or fumes.
Specialized Tools
Some tasks require specialized tools to make the job easier. A multimeter helps troubleshoot electrical systems, while wire strippers are essential for handling electrical wiring. If you're installing interior panels, a stud finder can help locate structural supports. These tools will come in handy as you move into the installation phase.
Key Materials to Gather
Insulation
Proper insulation is essential for maintaining comfort in different climates. Rigid foam insulation provides great thermal performance, and adding a reflective material behind wall panels can act as a radiant barrier for extra efficiency. Combining various types of insulation often works best to balance comfort and cost.
Structural Materials
For flooring and cabinets, high-quality plywood is a reliable choice. Use lumber, such as 2x2 or 2x3 boards, for framing walls and storage units. Secure these structures with metal brackets and hardware to ensure they hold up against road vibrations.
Electrical Components
If your conversion includes electrical work, stock up on essentials like LED light strips for energy-efficient lighting, appropriately gauged wiring, and safety devices such as fuses and circuit breakers to protect the system from overloads.
Finishing Materials
Finishing materials give your van a polished, livable feel. Lightweight wall panels create a clean look, and vinyl plank flooring is both durable and water-resistant - perfect for life on the road. To protect wooden surfaces, use finishes like wood stains or polyurethane.
Fasteners and Adhesives
A well-built van relies on secure connections. Keep a supply of self-tapping screws, construction adhesives, and rivets to ensure everything stays in place.
Your total costs will depend on your design, the complexity of your layout, and the finishes you choose. To save money, take advantage of sales and promotions at major retailers as you transform your van into a cozy, functional home on wheels.
sbb-itb-718b9e4
Step-by-Step Van Conversion Process
Now that you’ve gathered your tools and materials, it’s time to dive into the conversion process. By following a logical sequence, starting with the floor, you’ll create a solid foundation for the rest of your van build. Each step builds on your layout plan, ensuring everything comes together smoothly.
Install Insulation and Flooring
The floor is where it all begins. It provides thermal and sound insulation, keeps water out, and serves as the anchor for your cabinets and furniture. Getting this part right is crucial for the rest of your project.
Start with Preparation
Begin by thoroughly cleaning the van’s metal floor to remove all dust, grease, and debris. Address any rust spots by treating them with Rust-Oleum to prevent further corrosion. For any holes in the metal floor, fill them with silicone and cover them with 3M Aluminum Tape to ensure a watertight seal. To ensure accurate cuts later, create a floor template using large sheets of cardboard.
Adding Insulation Layers
Your layout plan will guide you in aligning the insulation and flooring with specific zones. For the best results, apply multiple layers of insulation. Start by leveling the corrugated floor. Cut Minicell foam strips (1/4″ or 3/8″ thick) to fit into the grooves, securing them with 3M 90 spray adhesive. Alternatively, you can use Great Stuff Expanding Foam, which both fills the gaps and acts as an adhesive.
Next, add a main insulation layer using 1″ thick XPS or Polyiso foam boards, which provide about R-5 of thermal resistance per inch. Cut the foam boards to match the contours of the van floor using a track saw or jigsaw, leaving a 1/2″ gap around the edges to prevent squeaking against the metal. Secure the foam to the floor with PL Premium 3X adhesive applied in a zigzag pattern.
For the wheel wells, insulate them with Reflectix, securing it in place with aluminum foil tape.
Installing the Subfloor
Once the insulation is in place, it’s time to add the subfloor, which provides stability and a smooth surface for your build. Use 1/2″ Baltic Birch plywood for its strength and finish. Trace the insulation layer to cut the plywood accurately, using a track saw for straight edges and a jigsaw for curves. If your design requires multiple plywood panels, connect them with biscuit or lap joints to ensure even seams and avoid unevenness down the line.
Apply PL Premium 3X or PL300 foam board adhesive to the insulation layer, then carefully lay the plywood subfloor on top. To ensure proper bonding, place uniform weight on the subfloor while the adhesive cures. Finally, fill the 1/2″ perimeter gap with Great Stuff Gaps & Cracks expanding foam. Once cured, trim it flush with a utility knife for a clean finish.
Final Touches and Testing
With your van's structure and essential utilities in place, it's time to make it feel like home. This final stage is all about adding personal touches to your space and ensuring that every system works as it should before you embark on your travels.
Customizing the Interior
Your van's interior should blend your personal style with smart, space-saving functionality. Start with lighting to create the right mix of ambiance and practicality. For example, LED strip lights under cabinets can brighten up tasks like cooking or reading, while warm-toned overhead lights set a cozy mood for evenings. Adding dimmer switches gives you control over brightness and helps conserve battery power when needed.
Storage is key in a small space, so think creatively. Use magnetic strips inside cabinet doors to hold knives or small tools, install tension rods in closets to keep clothes secure while driving, and organize your pantry with clear, stackable containers labeled for easy access.
When it comes to décor and comfort, lightweight, multi-purpose items are your best bet. Consider throw pillows that double as storage, foldable artwork, or plants in spillproof containers. Removable wall decals are another great way to add personality without making permanent changes.
Don’t overlook temperature control. Reflective window covers can help keep the van comfortable while also providing privacy. A small 12V fan improves airflow, and draft stoppers around doors and windows can minimize heat loss during colder months.
Testing and Final Adjustments
Once your interior is set, it’s time to ensure everything functions as intended. A smart way to test your setup is by doing a 48-hour trial run - either in your driveway or at a nearby campsite. This gives you a chance to spot and address any issues in a controlled environment.
For the electrical system, monitor your power usage and generation over a couple of days. Use multiple devices at the same time to test your system's load capacity, and check if your solar panels are charging the batteries efficiently. A multimeter is handy for verifying that all electrical connections maintain proper voltage under load.
For the water system, check for leaks by filling the fresh water tank and running the faucets. Inspect all connections and make sure the gray water drains smoothly into its designated tank.
Take the van for test drives on different terrains - highways, city streets, and gravel roads - to check for any rattles or shifting components. Ensure that cabinet doors stay securely closed and drawers don’t slide open during turns or sudden stops.
Keep a log of any issues you encounter during this trial phase. Address safety-related concerns first, followed by adjustments for convenience and comfort.
Ensuring Compliance and Safety
Before hitting the road, make sure your van meets all legal and safety requirements. These can vary by state, especially when it comes to vehicle registration. Depending on your state, your van may need to be classified as an RV or retain its original commercial designation. Some states require professional inspections for conversions, while others allow self-certification.
Safety equipment is a must. Install smoke detectors designed for mobile or RV settings to avoid false alarms, and place carbon monoxide detectors if you’re using propane appliances or a generator. A fire extinguisher rated for electrical and grease fires should be mounted near your cooking area for easy access.
Insurance is another important consideration. Standard auto insurance may not cover your custom modifications or personal belongings, so talk to your provider about specialized coverage options that protect your investment.
For electrical safety, make sure your 12V and 120V systems meet established standards. Use properly rated fuses and circuit breakers, and ground any metal components to prevent electrical hazards. If you’ve installed a 120V inverter system, it’s wise to have a qualified electrician inspect it, especially if you plan to connect to shore power.
Lastly, keep thorough documentation of your build. Save receipts, take photos throughout the process, and retain any inspection certificates. This paperwork can be invaluable for insurance claims or if you decide to sell your van down the road.
Conclusion: Key Takeaways for a Successful Van Conversion
Turning a van into a livable home is more than just a DIY project - it’s an invitation to embrace freedom and simplicity. While the process requires thoughtful planning, patience, and a willingness to learn, the result is a personalized space that reflects your lifestyle and priorities.
The cornerstone of a successful van conversion is careful planning. Start by selecting a van that fits your actual needs, sketching out a practical layout, and focusing on functionality in your design. These steps set the stage for a build that’s both efficient and long-lasting.
Using high-quality materials and ensuring proper installation is crucial. Durable insulation, dependable electrical components, and solid structural elements will save you from headaches down the road. Cutting corners here often leads to costly fixes later.
Before hitting the road, take time to test all your systems thoroughly. A trial period can help you identify and resolve any issues early, ensuring your van is road-ready and reliable.
Beyond the technical aspects, a van conversion is also a journey into minimalist living. It challenges traditional ideas about comfort and happiness, encouraging you to focus on experiences rather than possessions. Every decision you make during the build - what to include, what to leave behind - reinforces this shift toward simplicity and intentional living.
Your converted van offers a level of freedom and mobility that traditional housing simply can’t. Imagine waking up to ocean views one day and mountain peaks the next. But with this freedom comes responsibility - you’ll need to learn how to manage resources, handle maintenance, and adapt to life on the move.
Financially, van life can be a smart choice. Many who embrace this lifestyle save significantly on housing, utilities, and entertainment. However, success depends on staying disciplined with your budget and keeping your van in good shape.
Finally, remember that your van conversion is never truly “finished.” As your needs and experiences evolve, so will your van. The skills you gain during the initial build will help you make adjustments and improvements, keeping your home-on-wheels functional and comfortable.
The road from an empty van to a cozy home isn’t without its challenges. But every obstacle you overcome builds confidence and self-reliance. When you drive away in your custom-built van, you’re not just gaining a place to live - you’re proving to yourself that you can create the life you want, one step at a time.
FAQs
What should I consider when choosing a van to convert into a livable home?
When choosing a van for conversion, it’s all about balancing budget, size, and reliability. Your budget will determine whether you can opt for a newer van with fewer miles or an older model that might require extra maintenance. Size is another key factor - while larger vans give you more living space, they’re tougher to park and tend to use more fuel. On the other hand, smaller vans are easier to drive and more fuel-efficient, but they can feel a bit tight inside.
Consider how you plan to use the van. Is it for full-time living, long road trips, or keeping a low profile while camping? The shape of the interior is also worth noting - boxier vans simplify the build process and offer more usable space. Don’t forget to check the carrying capacity to make sure it can handle the weight of your conversion materials and belongings. Lastly, think about resale value - choosing a van that holds its value can pay off if you decide to sell it down the road.
How can I make sure my van's electrical and water systems are safe and reliable for full-time living?
To keep your van's electrical and water systems safe and reliable, it's crucial to focus on proper installation and consistent upkeep. For the electrical system, start by using cables that are the right size to prevent overheating. Make sure all components are securely mounted and positioned away from any water sources. Adding safety measures like circuit breakers or fuses is a smart way to guard against potential electrical issues.
When it comes to the water system, ensure all connections are sealed tightly to prevent leaks. Placing the water tank in a secure, easy-to-access spot - such as under the van's chassis - can make maintenance much simpler. Regular inspections of both systems for signs of wear or damage are key. And for any complex electrical work or steps you’re uncertain about, don’t hesitate to consult a licensed professional.
By following these steps, you'll set yourself up with a dependable and safe setup, ready to support your van life adventures.
What are the best ways to maximize storage and functionality in a small van?
Maximizing storage and making the most of a small van's functionality takes a bit of ingenuity and smart planning. Start by utilizing vertical space - install overhead cabinets or shelves to store lighter items like clothing or kitchen essentials. Another clever approach is under-bed storage - a platform bed with built-in drawers or sliding compartments can hold bulkier gear without wasting valuable space.
Consider multi-functional furniture to keep things practical. A bench seat with hidden storage or a fold-out table can serve multiple purposes without taking up extra room. Add hooks and racks on walls or doors to hang jackets, bags, or utensils, and keep smaller items tidy with packing cubes or baskets. For those hard-to-reach deep cabinets, install sliding drawers or pull-out shelves to make access easier. If you need extra space, rooftop storage is a great option for items you don't need regularly.
Finally, get creative with overlooked spaces like under seats or around wheel wells. Invest in foldable or collapsible items, such as chairs and tables, to save room while still having everything you need. Every inch counts, so think creatively to make your van both functional and efficient!