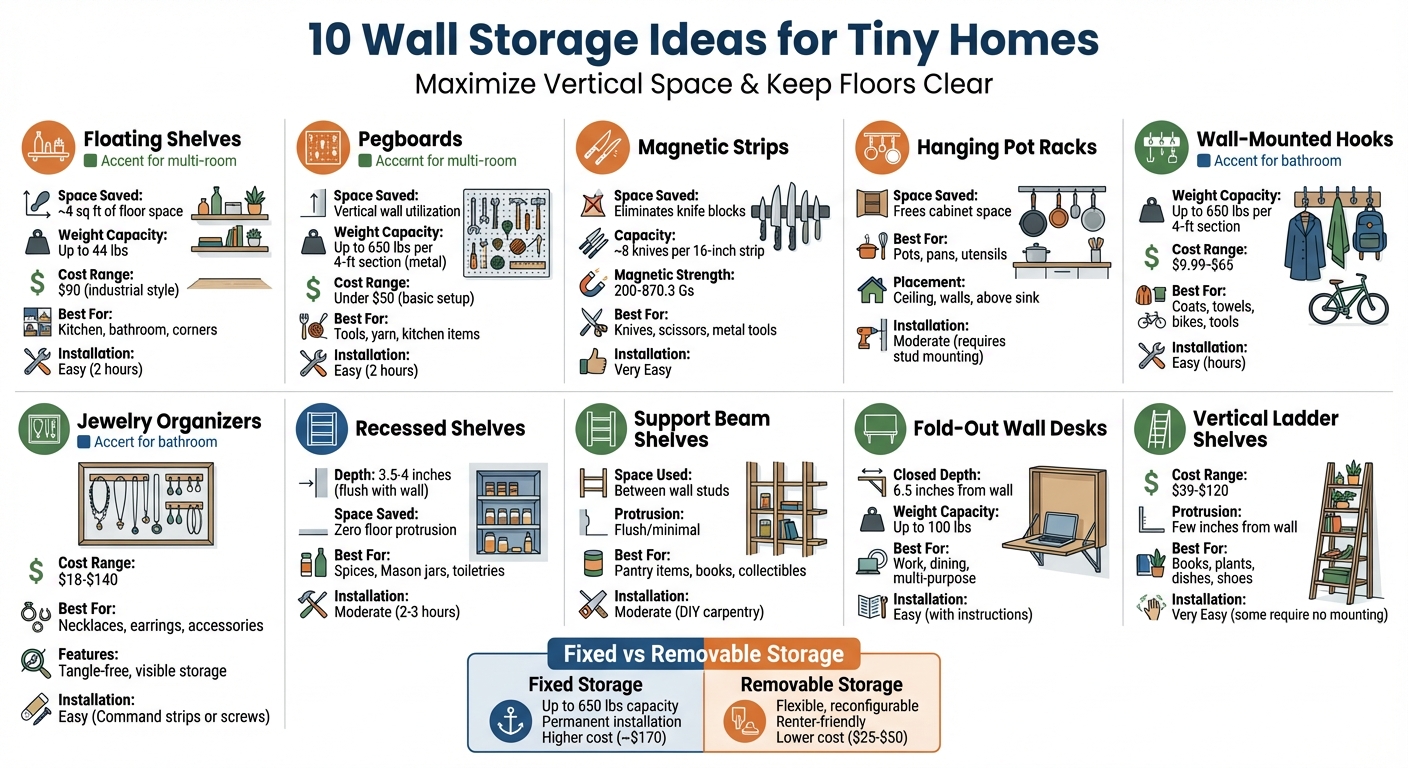
10 Wall Storage Ideas for Tiny Homes
10 wall storage solutions to maximize vertical space in tiny homes — from floating shelves and pegboards to magnetic strips and fold-out desks.
Nomad Adjacent2 months ago
10 Wall Storage Ideas for Tiny Homes
In small homes, making the most of vertical space is key. This guide covers 10 wall storage ideas to help you save floor space, stay organized, and keep your home functional. From floating shelves to recessed shelving, these solutions work for kitchens, bathrooms, and beyond. Here's a quick breakdown:
- Floating Shelves: Maximize wall space and keep floors clear.
- Pegboards: Adjustable storage for tools, kitchenware, or decor.
- Magnetic Strips: Perfect for knives, tools, or small metal items.
- Hanging Pot Racks: Free up cabinets by storing cookware vertically.
- Wall-Mounted Hooks: Easy, versatile storage for coats, towels, or keys.
- Jewelry Organizers: Keep accessories visible and tangle-free.
- Recessed Shelves: Built into walls to save space.
- Support Beam Shelves: Use structural spaces for hidden storage.
- Fold-Out Wall Desks: Great for workspaces that disappear when not in use.
- Vertical Ladder Shelves: Slim, leaning shelves for tight areas.
These ideas combine functionality and style, ensuring your tiny home stays organized without feeling cramped.
10 Wall Storage Solutions for Tiny Homes Comparison Guide
1. Floating Shelves
Space-saving potential
Floating shelves are a game-changer in tiny home design, making the most of vertical space while keeping the floor free for movement. Unlike bulky dressers or cabinets that eat up precious square footage, these wall-mounted shelves create storage without intruding on your living area. For example, one homeowner freed up about four square feet of kitchen counter space simply by shifting items to wall-mounted shelves. You can even get creative by installing them in overlooked spots, like above doorways or windows, to turn unused wall space into practical storage. And don’t forget corners - corner floating shelves are perfect for those tricky angles that often go unused.
Ease of installation
Installing floating shelves is surprisingly straightforward, even if you’re not a seasoned DIYer. Start by finding wall studs with a stud finder to ensure a secure anchor point. Then, use a laser level to keep everything straight and gently tap the shelf onto the bracket pins with a rubber mallet to protect the finish. Pair the shelves with the right screws and brackets, and you’ll have a sturdy setup in no time.
Functionality and versatility
Floating shelves are incredibly versatile and can adapt to any room or purpose. In the kitchen, they’re perfect for storing dishes, spices, or cookware. In the bathroom, tempered glass shelves are a great choice - they resist moisture and maintain a sleek, minimalist vibe. Want to maximize storage? Add hooks underneath the shelves to hang mugs, utensils, or towels. You can also stagger shelves at different heights to fit items of varying sizes while adding a touch of visual flair. For corners, ready-made units like Love-KANKEI’s five-tier shelves can hold up to 44 lbs (8.8 lbs per tier), making them ideal for plants or other essentials. If you need heavy-duty storage, industrial-style pipe shelving units, such as the Bestier 5-tier (priced around $90), combine sturdy metal frames with wood for both style and strength.
Aesthetic appeal
The right materials can elevate floating shelves from purely functional to downright stylish. Light-colored wood or clear glass, for instance, can create a bright, minimalist vibe that enhances small spaces. With the right choices, your shelves can be as beautiful as they are practical.
sbb-itb-718b9e4
2. Pegboards
Space-saving potential
In small homes, where every inch matters, pegboards are a game-changer for turning unused wall space into practical storage. They shine in areas often overlooked, like the inside of cabinet doors, under-stair nooks, or even as a creative substitute for bulky headboards. A great example comes from 2021, when Monica Chavez from Northern California transformed an awkward L-shaped space under her staircase. Using 2'x4' plywood panels and 3-inch dowels, she built an interactive toy storage nook for just $40 in a single weekend.
"My main goal was to take advantage of the vertical space and make it interactive, but functional at the same time".
- Monica Chavez
For those living in compact spaces, pegboards offer a clever way to free up floor space while keeping essentials within easy reach. And the best part? It’s an idea that’s as practical as it is affordable.
Ease of installation
Pegboards are surprisingly easy to install, making them a great project for beginners. Most installations take about two hours. The key is to create about 1/2 inch of space behind the board, called "standoff" space, so hooks can fit properly. To do this, you’ll first mount 1x2 or 1x3 furring strips to the wall studs, then secure the pegboard to those strips. A basic setup costs less than $50 in materials.
For heavier items, go with a 1/4-inch thick pegboard instead of the thinner 1/8-inch version. The thicker option can handle larger hooks and heavier tools with ease.
Functionality and versatility
The beauty of pegboards lies in their flexibility. With hooks, bins, and shelves that can be rearranged, they adapt to your changing storage needs. Take Bobbie Ann Tilkens-Fisher, a Pennsylvania interior stylist, as an example. She installed IKEA's SKÅDIS pegboard system in her Victorian-era home studio to organize her yarn business. The result? Over 125 balls of yarn stored vertically, freeing up floor space previously cluttered with baskets.
Metal pegboards are a great option for heavy-duty storage, with some systems supporting up to 650 lbs per four-foot section. To keep hooks secure, you can use zip ties, specialized locks, or even a dab of hot glue. For smaller items, try adding PVC pipe segments as custom holders.
Aesthetic appeal
Pegboards aren’t just functional - they can be stylish too.
"It's gone from industrial use for your garage to you see it in high-end design and coffee shops, which is kind of neat".
- Bobbie Ann Tilkens-Fisher
To match your décor, paint the board with primer followed by semi-gloss or gloss paint, and consider adding trim for a polished, framed look. Just make sure to apply light coats to avoid clogging the peg holes. Whether you’re crafting a spice-filled open pantry or turning an entire wall into an organized display, pegboards combine practicality with a touch of creativity that traditional storage solutions simply can’t offer.
3. Magnetic Strips and Knife Racks
Space-saving Potential
Magnetic strips are a game-changer for small kitchens, doing away with the need for bulky knife blocks and freeing up precious counter and drawer space. A typical 16-inch magnetic strip can hold about eight knives, ranging from chef's knives to heavy cleavers, making it a compact and efficient storage option. Placing these strips in often-overlooked spots can further maximize your kitchen's functionality.
But their usefulness doesn't stop at knives. These strips can also neatly organize scissors, metal kitchen tools, and even magnetic spice tins or jars. And outside the kitchen? They’re just as handy. In bathrooms, they can hold items like tweezers, nail clippers, and bobby pins, while in entryways, they keep keys and other small metal accessories within easy reach.
Ease of Installation
Installing a magnetic strip is straightforward. Using a paper template ensures perfectly aligned holes, while renters can opt for magnetic knife blocks with a sturdy, flared base as a non-permanent alternative.
When selecting a strip, go for one with a continuous magnetic field rather than individual magnets. This ensures even smaller items, like paring knives, stay securely in place. Proper installation not only keeps your tools accessible but also ensures they’re safely stored.
Functionality and Versatility
Magnetic strips don’t just store knives - they protect them. By keeping blades out of drawers where they might get jostled, these strips help maintain sharpness and cleanliness. Just make sure to dry your knives thoroughly before mounting to prevent rust. Position them carefully to balance safety and accessibility.
The strength of the magnetic field matters, too. High-quality strips can provide up to 870.3 Gs of magnetic strength, while more basic models offer between 200 and 300 Gs. Many experts favor wood-surfaced magnetic strips, as they’re quieter and gentler on blades, reducing the risk of damage.
Aesthetic Appeal
Magnetic strips don’t just save space - they can elevate the look of your kitchen. Wooden options, made from materials like acacia or walnut, bring warmth and a rustic charm to tiny kitchen spaces. On the other hand, sleek stainless steel strips offer a modern, professional vibe. While wood surfaces may need occasional oiling to maintain their finish, metal strips are durable and low-maintenance.
"The considered, space-saving design minimizes countertop traffic by elevating your cutlery, literally." – Schmidt Brothers
For a creative twist, consider mounting magnetic strips inside cabinet doors to keep clutter hidden or across narrow spaces between appliances to make the most of unused wall areas. These clever ideas ensure your small kitchen stays both efficient and visually appealing - all without sacrificing essential tools.
4. Hanging Pot Racks
Space-saving Potential
Hanging pot racks are a clever way to turn unused vertical space into practical storage, giving you more room in your cabinets and on your counters. By installing racks on walls or ceilings - above the sink, under cabinets, or even from ceiling beams - you can keep bulky pots and pans off your shelves without losing valuable space. In small kitchens, every inch counts.
"By using vertical storage in your tiny home, you can free up precious shelf and counter space." – Extra Space Storage
Ceiling-mounted racks work especially well over kitchen islands. They make it easy to grab what you need while keeping counters clear for cooking and preparation. With this setup, you not only declutter but also make your cookware more accessible.
Ease of Installation
Installing a hanging pot rack takes a bit of planning to ensure it’s securely anchored, especially since it needs to hold heavy cookware. Always attach the rack to wall studs or ceiling beams - not just the surface material. Use a stud finder to locate these supports before drilling. For a simpler option, you could mount a sturdy pegboard with heavy-duty hooks, which lets you adjust the layout to fit your cookware.
When hanging racks overhead, make sure they’re high enough to avoid accidental bumps but still easy to reach during cooking. If your home is mobile, secure the items with a retention bar, bungee cords, or even a strip of wood or magnets to keep things stable while on the move.
Functionality and Versatility
Hanging racks aren’t just for pots and pans. Add S-hooks to hang spatulas, whisks, measuring cups, ladles, or even mugs. You can easily rearrange the hooks to fit your changing needs.
"Hang pots and pans from sturdy hooks, freeing precious cabinet space in your cramped kitchen." – Tidbits of Experience
Position racks above the sink or kitchen island to keep tools within easy reach. For even more storage, add hooks underneath existing wall shelves to use every bit of available space.
Aesthetic Appeal
Hanging pot racks don’t just save space - they also enhance your kitchen’s look. Displaying copper pots, colorful enamel pans, or vintage cast iron pieces can add personality and charm to your space. This approach fits perfectly with the trend of open storage, where everyday items double as décor.
"Embrace open storage, where your belongings are not just stowed away, but easily accessible and become a part of your personality and décor." – IKEA
Whether you prefer a sleek metal rack for a modern vibe or a rustic wooden beam for a farmhouse feel, hanging storage combines style and practicality, making it a smart solution for small kitchens.
5. Wall-Mounted Hooks and Racks
Space-saving Potential
Wall-mounted hooks and racks are a clever way to make the most of your vertical space while keeping floors clutter-free. Over-door hooks, for instance, can transform bathrooms or entryways into more functional areas without taking up additional room. Options like retractable hooks or full-height racks are especially handy for storing seasonal items out of the way, while keeping daily necessities easily accessible.
And the best part? They’re easy to set up, even for beginners.
Ease of Installation
Setting up hooks and racks is a breeze. With just a few basic tools, most people can tackle the installation in a matter of hours. For heavier items, it's best to secure hooks directly into wall studs using screws. Wall studs are usually spaced 16 or 24 inches apart, so an electronic stud finder can help you locate them before drilling. If you can’t find a stud, no worries - weight-rated anchors work well with drywall and provide solid support.
For lightweight or temporary setups, adhesive solutions like Command strips are a game-changer. They’re perfect for renters or anyone who wants a no-drill option. To ensure a polished look, use paper templates to plan your layout before committing.
Functionality and Versatility
Hooks and racks are incredibly versatile and can be put to work in nearly every room. In the kitchen, they’re perfect for organizing mugs, utensils, or even pots and pans. Bathrooms benefit from hooks for towels, robes, and hair tools, while entryways become more functional with spots for coats, bags, keys, and leashes. In garages, heavy-duty hooks can handle bicycles and tools, with some systems supporting up to 650 pounds per four-foot section. Specialized racks for items like jewelry, yoga mats, or shoes are also widely available.
Want to up the functionality even more? Combine hooks with small shelves or baskets to create a multi-purpose storage hub, perfect for busy areas.
Aesthetic Appeal
Beyond functionality, hooks can bring a stylish touch to your walls. Unlike plain nails, they add texture and dimension. With designs ranging from rustic wood to sleek modern metal, there’s something to match every décor style. For example, the Umbra Sticks Multi-Hook Rack or the Umbra Picket Wall-Mounted Hook are popular choices that blend both style and practicality, earning rave reviews.
"The wood pegs add a little more dimension and sophistication [than a simple nail]." – Thistle Key Lane
Hooks can even double as décor themselves. Use them to display artwork, wreaths, or vintage clothing for a creative twist. Budget-friendly options start at just $9.99, while designer picks from brands like Umbra or Yamazaki range from $25.00 to $65.00, making it easy to find something that fits your style and budget.
6. Jewelry Organizers
Space-Saving Potential
Wall-mounted jewelry organizers are a clever way to turn unused vertical space into functional storage while keeping your countertops and dresser tops clutter-free. A simple DIY hook board made from 1x2 wood strips can sit flush against the wall, offering an easy and effective solution for smaller collections. For those with larger assortments, wall-mounted armoires with mirrored fronts provide a dual-purpose option - storing your jewelry and doubling as a full-length mirror.
Using the back of a door or narrow wall spaces allows you to hang your jewelry vertically, ensuring every piece is visible. This setup not only keeps your collection organized but might also encourage you to wear more of what you already own.
Ease of Installation
Setting up these organizers doesn’t require much effort. Renters can opt for tool-free solutions like large Command Strips or over-the-door designs, while screw-mounted units are a straightforward option for those with access to basic tools and wall anchors.
Modern modular systems simplify installation with a "twist-and-lock" mechanism. You install a baseplate once and can easily attach or rearrange hooks and jars with a quick quarter-turn - no extra tools needed. For a DIY approach, spacing cup hooks about 0.75 inches apart works well for hanging earrings and necklaces. Adding a wooden dowel between two hooks creates a practical, removable bracelet bar.
Functionality and Versatility
One of the standout benefits of wall-mounted jewelry storage is its ability to keep your pieces tangle-free - a common issue with traditional jewelry boxes. Hanging necklaces individually on hooks not only prevents knots but also makes everything easy to see and access. Many wall-mounted cabinets offer extra features like lockable doors for added security and built-in LED lights to help you locate items in low-light conditions. High-end options may even include anti-tarnish fabric linings to protect costume jewelry from oxidation.
"Having my jewelry out in the open allowed me to see it all much easier (which then prompted me to actually wear it more!)" – Megan, The Homes I Have Made
Whether you prefer open displays for quick visibility or closed cabinets to shield fine jewelry from dust and sunlight, there’s an option to suit your needs. Modular systems can adapt as your collection grows, while fixed DIY boards create a clean and streamlined look. These organizers not only keep your jewelry orderly but can also enhance the overall aesthetic of your space.
Aesthetic Appeal
Besides their practicality, wall-mounted jewelry organizers can double as decorative elements, turning your collection into a display of wearable art. Materials like wood, cork, or metal mesh blend seamlessly with minimalist or rustic interiors. For a creative touch, you can repurpose a decorative picture frame with cork or mesh to create a hidden organizer that also serves as wall art.
Options range widely in price and style, from simple wall displays ($18–$29) to rustic holders ($40–$80), full-length mirrored cabinets ($80–$100), and premium custom organizers ($100–$140). Many highly-rated choices on artisan marketplaces boast 4.7-star reviews or higher, with users praising their ability to keep jewelry organized and easy to find.
"Storage is really about compliance. If there's a really amazing piece of storage that is perfect and works really well in the abstract, but you're never going to use it or you hate how it looks, then it's not for you." – Ope Omojola, Founder, Octave Jewelry
7. Recessed Shelves
Space-Saving Potential
Recessed shelves make clever use of the space between wall studs, turning it into practical storage without taking up any extra room. These shelves are built flush with the wall, typically offering a depth of 3.5–4 inches, so they don’t stick out into your living area. This makes them a great solution for narrow hallways, small bathrooms, or tight kitchens where every inch matters.
"This shelf sits right in the wall so it doesn't protrude into limited space." - Hannah Bruneman, Editorial Associate, Better Homes & Gardens
Unlike floating shelves, recessed shelves keep walkways clear while still providing vertical storage. They can even be incorporated into partition walls, doubling as storage and a room divider.
Ease of Installation
Installing recessed shelves is a straightforward project that usually takes just 2–3 hours. Start by using a stud finder to locate the wall studs, then cut a 16x16-inch opening to fit a pre-built box frame that will be secured to the studs.
Begin with a 3x3-inch inspection hole to check for any hidden wires, plumbing, or ductwork using a mirror and flashlight. When cutting the drywall, angle your cuts at 45° to keep debris from falling into the wall cavity. For a polished look, make sure the box frame includes a 1–2-inch lip to cover raw edges and give the shelf a clean, built-in appearance.
This simple process ensures your recessed shelves blend seamlessly into your space while adding functional storage.
Functionality and Versatility
Once installed, recessed shelves are perfect for organizing smaller items like spices, Mason jars, or toiletries. You can get creative with the interior by painting it, staining wood, or even adding a pegboard back for adjustable hooks.
"We created a secondary pantry space between the studs on the wall separating our kitchen and the bathroom. The shallow shelves fit Mason jars perfectly!" - Alexis Stephens, Co-founder, Tiny House Expedition
For tiny homes or mobile spaces, adding a thin wooden strip or a magnetic strip along the front of the shelves can help keep items secure during travel.
Aesthetic Appeal
Recessed shelves offer a sleek, built-in look that reduces visual clutter and keeps your space feeling open. You can finish them with decorative paint, wallpaper, or light-colored wood, making them a stylish focal point. The result often mimics custom millwork, transforming unused wall space into both a functional and visually appealing design feature.
8. Support Beam Shelves
Space-Saving Potential
Support beam shelves take vertical storage to the next level by putting unused structural spaces - like the gaps between wall studs or exposed beams - to work. Unlike floating shelves that stick out into the room, these shelves sit snugly within the wall cavity, creating a sleek and unobtrusive storage solution. This makes them a perfect fit for narrow hallways, compact bathrooms, or small kitchens where space is at a premium.
"When you can't find a convenient nook for a set of narrow storage shelves, you can often create one by recessing the shelves into the wall itself." – Family Handyman
To create these built-in shelves, you can install drywall or wood paneling on one side of a dividing wall, turning the exposed beam space into practical storage without taking up any floor area. For tiny homes on wheels, securing items with wooden or magnetic strips ensures everything stays in place during travel. Like other wall-mounted storage ideas, support beam shelves maximize vertical space while keeping the floor entirely clear.
Ease of Installation
Installing support beam shelves is a simple project that most DIY enthusiasts can handle with basic carpentry tools. First, use a stud finder to locate the beams and check behind the wall for any obstacles. For standard 2x4 stud walls, construct the shelf frame using 1x4 lumber to ensure a seamless fit.
You’ll need materials like lumber, screws, nails, wood glue, trim, and standard tools. Depending on your wall, you can either remove the finish to expose the beams or cut an opening slightly smaller than the cabinet size into a finished wall. Once installed, these shelves provide practical storage and add a touch of design flair to your space.
Functionality and Versatility
These shelves are ideal for storing smaller items like spices, Mason jars, toiletries, books, or collectibles. For example, a Tiny House Expedition project cleverly used the space between wall studs to create a secondary pantry that perfectly fits Mason jars. Additionally, ceiling support beams can be outfitted with heavy-duty hooks to hold larger items like surfboards, skateboards, or bicycles - keeping them off the ground and out of the way.
Aesthetic Appeal
Support beam shelves offer two distinct looks, allowing you to tailor the design to your style. If you leave the beams exposed, you’ll achieve a rustic, architectural vibe that highlights the home's structure. On the other hand, recessed cabinets with matching trim create a clean, built-in appearance. You can enhance the beam space further with wallpaper, paint, or stain to complement your decor. For a polished look, consider painting the beams to match your kitchen cabinets or wall trim. This seamless integration not only reinforces the open, airy feel of small spaces but also maintains the article's focus on maximizing storage without compromising style.
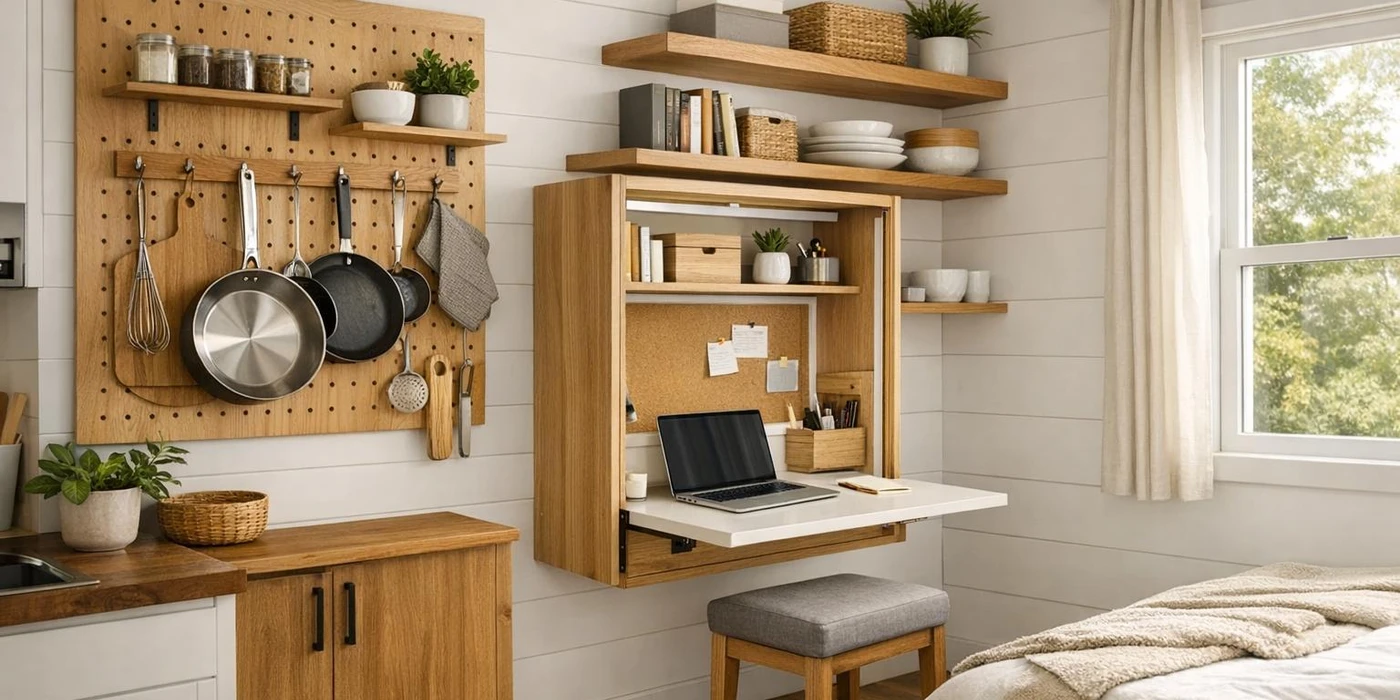
9. Fold-Out Wall Desks
Space-Saving Potential
Fold-out wall desks are a clever solution for saving space. They attach directly to the wall and can fold flat when not in use, freeing up valuable floor space. When closed, these desks typically stick out only about 6.5 inches from the wall, making them almost unnoticeable in compact areas. This design helps reduce visual clutter near the floor, a key trick for making small rooms feel more spacious. They can be installed in underused spots like angled corners, under-stair areas, or narrow hallways, making the most of awkward spaces. Plus, they pair effortlessly with other vertical storage options, emphasizing simplicity and efficiency.
Ease of Installation
Most fold-out desks come with all the hardware and instructions you need, making them a great DIY project for beginners. To ensure stability, mount the brackets directly into wall studs, which are generally spaced 16 inches apart. If the studs don’t align perfectly, you can adjust the bracket positions as needed. Before installation, check that the desk has enough clearance to open fully without bumping into furniture or blocking walkways.
Functionality and Versatility
These desks aren’t just for work - they can also serve as dining tables or extra counter space. Many models include built-in storage like shelves, hooks, or compartments, perfect for organizing office supplies or kitchen items. High-quality versions can support up to 100 lbs, making them sturdy enough to hold heavy laptops, printers, or even a meal setup. For added convenience, pair the desk with collapsible chairs that can be tucked away when not in use, keeping the floor area clear.
"This versatile piece isn't just a desk - it also serves as a study area, dining spot, or display table." – VEVOR
Aesthetic Appeal
Modern fold-out desks combine style with practicality. Many feature sleek, waterproof surfaces that are easy to clean and maintain. Some designs even include a blackboard or chalkboard on the outside panel, doubling as a message board or creative space when the desk is folded up. Choosing light wood finishes or materials that match your wall color can help the desk blend seamlessly into the room, creating an open and airy feel. For safety in tight spaces, look for models with rounded or curved corners.
10. Vertical Ladder Shelves
Space-Saving Potential
Vertical ladder shelves are a clever way to make the most of your wall space. Instead of spreading out horizontally, they take advantage of vertical height, turning unused wall space into functional storage. Their slim, leaning design typically sticks out just a few inches from the wall, so your floor stays open and uncluttered. Plus, the vertical layout naturally draws the eye upward, which can make small rooms feel taller and less confined. These shelves are perfect for tight spots - like narrow gaps between windows, corners, or hallway walls - where traditional cabinets just won’t fit.
Ease of Installation
Setting up ladder shelves is refreshingly simple. Many models, like the Nathan James Theo, come with basic metal brackets for easy anchoring. Some leaning designs don’t even require wall mounting - they rest against the wall at an angle. That said, securing them is a good idea for safety, especially in high-traffic areas. For renters or those who like to rearrange often, these shelves are easy to move and reconfigure, making them a flexible storage solution.
Functionality and Versatility
Ladder shelves shine in any room. Use them in dining areas as a sleek alternative to bulky china cabinets, perfect for storing stemware and decanters. In bathrooms, they double as stylish towel racks, and in entryways, they make great shoe organizers. Their open design allows you to mix storage with decor - display books, plants, or dishes to create a functional yet visually appealing setup. This dual-purpose design is a lifesaver in small spaces where every inch counts, making ladder shelves an essential part of any vertical storage plan.
Aesthetic Appeal
These shelves aren’t just practical - they’re stylish too. Many modern designs combine materials like walnut wood and metal for a trendy, minimalist look. For example, the Nathan James Theo 4-Shelf Bookcase, priced at around $120, offers both form and function. The open shelving design keeps the space feeling light and airy, avoiding the boxed-in vibe that can happen in smaller rooms. If you’re on a budget, options like the Harriet Bee Brinker-Smith Floating Bookcase start at just $39 and offer similar functionality. With finishes to match any decor, ladder shelves are a smart way to maximize vertical storage while keeping your tiny home feeling spacious and stylish.
Top Storage Ideas For Tiny Homes
Fixed vs. Removable Wall Storage: Comparison
When deciding on wall storage for a tiny home, the choice often comes down to fixed options like floating shelves and built-ins, or removable solutions such as pegboards and hooks. Each has its own strengths, depending on your lifestyle and storage priorities.
Fixed storage, which involves securing shelves or cabinets to wall studs or using heavy-duty anchors, is known for its strength and durability. For instance, the Rhino Universal Garage Storage Kit can hold up to 650 pounds per four-foot section. It also takes advantage of recessed spaces between support beams, offering a sleek and streamlined look. However, the main drawback is its permanence - reconfiguring or removing fixed storage typically requires renovations. Alexis Stephens from Tiny House Expedition highlights an important balance:
"The decreased amount of storage helps you adhere to the minimalist principles the tiny house movement sprang from. However, your life needs storage".
On the other hand, removable storage offers flexibility. Pegboards, often 22- or 24-inches wide, allow you to rearrange hooks and bins as needed, though they require about ½ inch of standoff space for proper installation. For renters or those who frequently relocate, options like adhesive hooks or suction caddies ensure walls remain undamaged. The trade-off? Lower weight capacity. While standard 1/8-inch pegboards work for lighter items, heavier tools may require sturdier 1/4-inch versions.
Both types of storage have specific advantages depending on the room. In kitchens, removable options like magnetic strips and pegboards keep utensils within easy reach, while fixed floating shelves are ideal for storing heavier pantry items. In bathrooms, recessed cabinets make the most of narrow spaces, whereas over-the-door racks provide a convenient, removable way to hold towels. For bedrooms, fixed floating bookcases offer sturdy storage, while removable jewelry organizers make efficient use of vertical wardrobe space.
Cost is another factor to consider. Fixed storage often comes with a higher price tag - wall-mounted cabinets average around $170, and custom built-ins usually require professional installation. Removable options, like floating bookcases for $39 or yoga mat holders for $25, are more budget-friendly. For mobile homes, securing fixed shelves with additional straps can prevent shifting during travel. Ultimately, fixed storage provides durability, while removable solutions cater to flexibility, making it easier to tailor your storage to the unique demands of tiny home living.
Conclusion
Wall storage is a smart way to save floor space while making the most of your vertical space. Whether it’s floating shelves that keep the floor clear or pegboards that free up about four square feet of counter space, these ideas tackle the challenges of compact living head-on. They’re practical solutions that cater to a variety of living situations.
It’s also important to choose storage options that fit your lifestyle. For those who move often, removable choices like magnetic strips and hooks are great because they’re easy to install and won’t damage walls. Pegboards are another handy option to keep your essentials neatly organized.
Want to brighten up your space? Go for glass or light wood shelving to let natural light flow through, keeping your room from feeling cramped. If you live in a mobile home, make sure to secure shelves to avoid any shifting during travel.
Wall-mounted storage not only keeps your floors clear but also creates a sense of openness, making your room feel larger and more inviting. From magnetic strips for kitchen tools to floating shelves for books, these solutions make minimalist living practical and stylish. They help you maintain a clutter-free space without sacrificing functionality.
For more tips on minimalist living, downsizing, and creative ways to optimize your space, check out Nomad Adjacent. It’s a great resource for exploring alternative housing and making the most of small spaces.
FAQs
What’s the best way to choose wall storage for a tiny home?
To find the ideal wall storage for your tiny home, start by measuring your available wall space in either inches or feet. Be sure to leave a few inches of clearance around doors, windows, and outlets to avoid any installation issues. Once you have your measurements, think about what you plan to store. Heavier items, like pots and pans, will require sturdier brackets, while lighter items can sit comfortably on floating shelves.
Consider multifunctional options such as built-in shelving or wall-mounted desks to make the most of your limited space. Check the weight capacity of the storage units and ensure your walls can handle the installation. For drywall, lighter shelves may need anchors, but heavier units should always be secured to wall studs for safety.
Finally, choose a style and finish that matches your home’s look while keeping an eye on your budget. With some thoughtful planning, you can create a storage solution that’s both practical and visually appealing for your tiny home.
How can I add wall storage in a rental without damaging the walls?
When it comes to adding wall storage without jeopardizing your security deposit, there are plenty of renter-friendly options to explore. Start with adhesive hooks or strips - these are great for hanging lightweight items like coats, bags, or towels. They hold firmly in place but can be removed cleanly when it’s time to move out. If you’re looking for something a bit more stylish, consider peel-and-stick floating shelves. They give the appearance of built-ins without the hassle of drilling holes.
To make the most of vertical space, try over-the-door organizers for closets or pantry doors. These are perfect for keeping things tidy without taking up floor space. Another clever option is using tension rods to create temporary racks between walls. Both solutions are easy to set up and won’t leave behind any damage.
Before making any updates, it’s a good idea to review your lease for specific rules and take photos of the wall condition both before and after. This way, you’ll have proof that everything was left just as it was when you moved in.
What are the best materials for stylish and durable wall storage in tiny homes?
When it comes to wall storage in tiny homes, galvanized steel pegboards are a smart pick. They resist rust, have a modern look, and are excellent for keeping tools or accessories neatly arranged. If you’re aiming for a warm, inviting vibe, consider solid or engineered wood like LP SmartSide. It adds a polished touch that enhances the cozy atmosphere of a small space. For those on a tighter budget, plywood or OSB panels offer a sturdy and practical option, blending well with both functional and minimalist designs. Pick materials that reflect your style while standing up to the demands of everyday life in a compact home.